How to implement relevance-level tagging (RLT)
Last updated on 2023-08-01.
If you want to read about the advantages of using RLT, go here.
Setting things up to use RLT in your Obsidian vault is pretty straightforward:
- Create three pages to serve as your relevance-level tags: [[relevance - high]], [[relevance - medium]], [[relevance - low]].
- Create a template and add to it some simple query language.
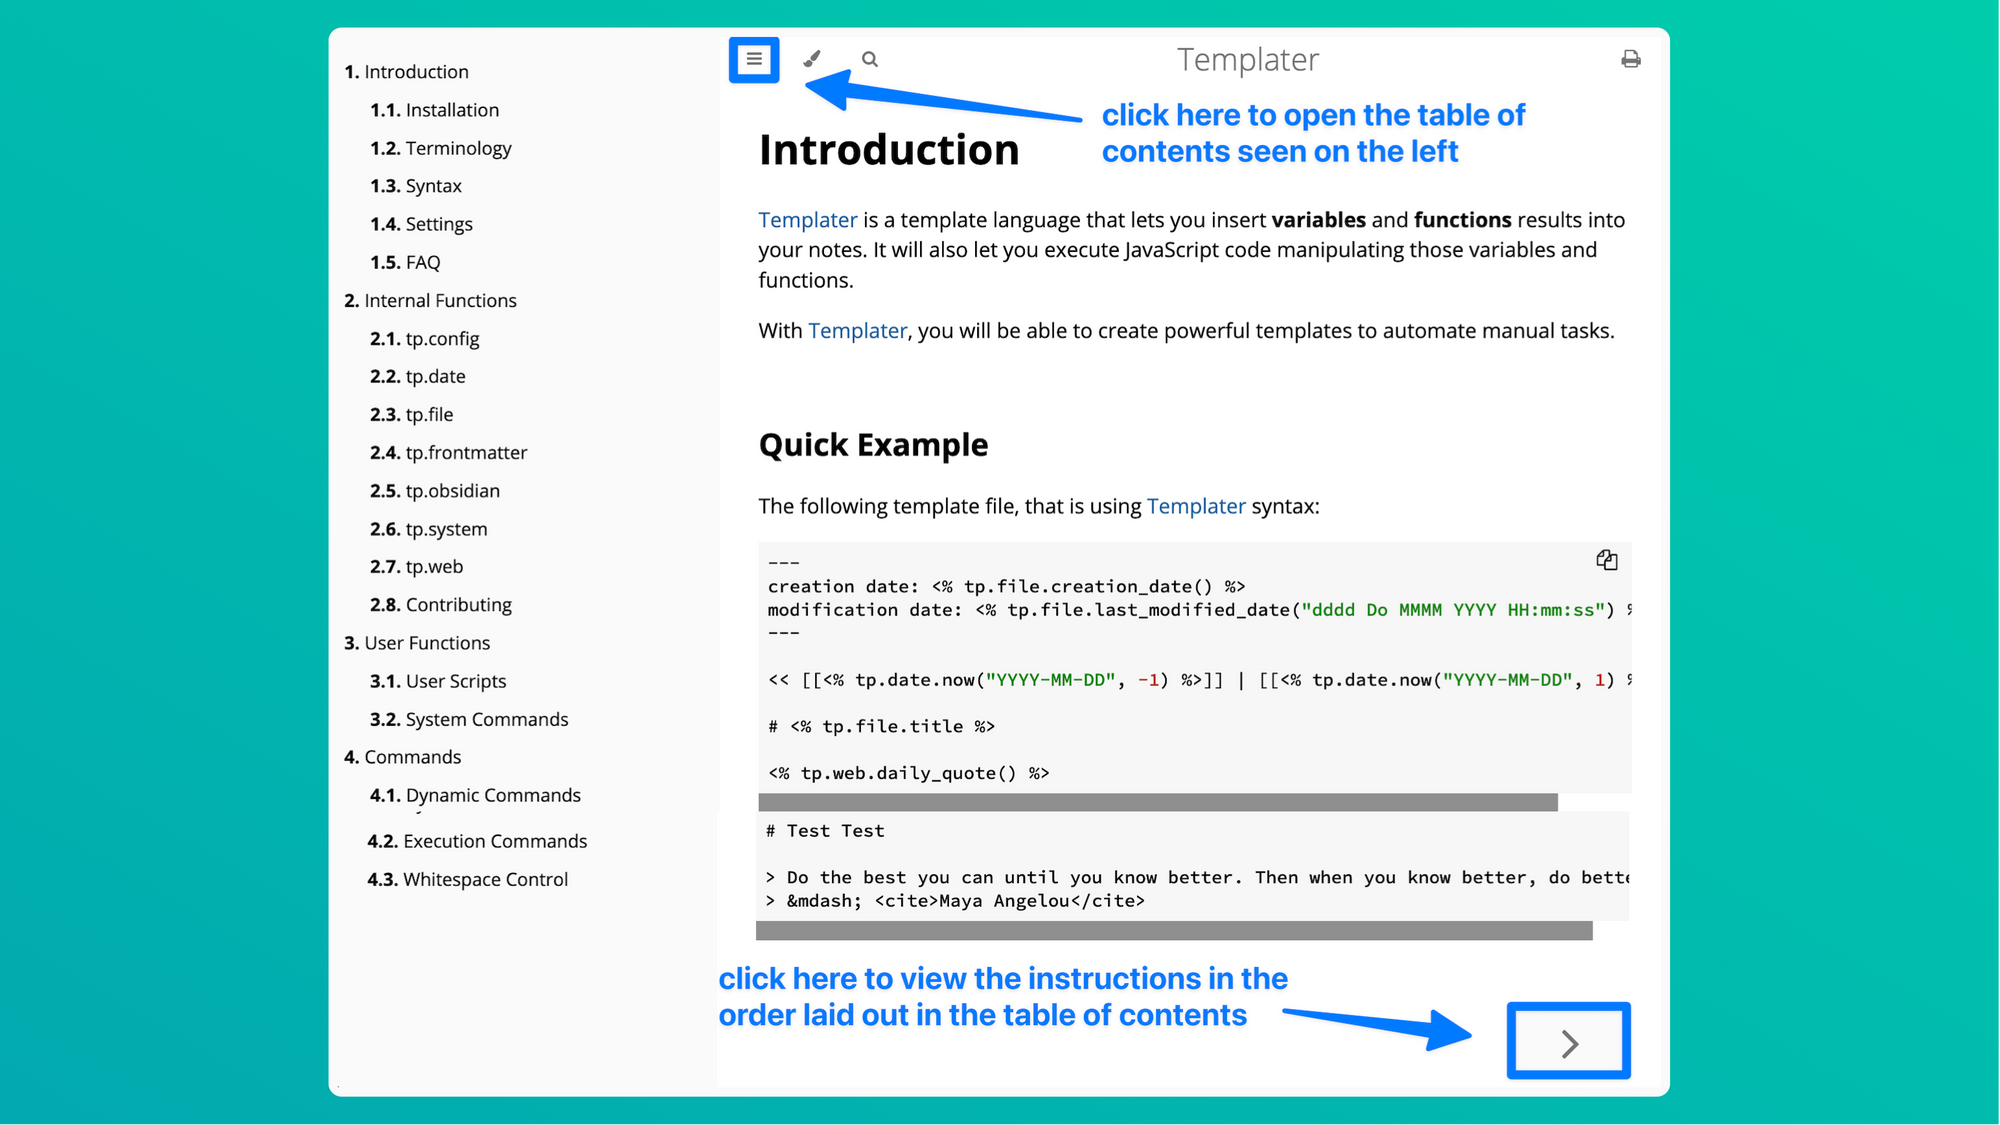
If you already know how to create and invoke templates in Obsidian, setting up relevance-level queries is going to be a breeze (you can scroll down and start reading the section titled 3b. The query language to use). If you're new to using templates, you should probably start with the first section below.
Note: the queries you'll find on this page do not require that you use the Dataview community plug-in. That plug-in is definitely worth learning how to use, but there's no need for it when it comes to implementing RLT.
If you want to use RLT but are a Logseq rather than an Obsidian user, watching the two Logseq videos at the very bottom of this page might be of help.
1. Create three pages to serve as your relevance-level tags
You may or may not want to create a folder to store your relevance-level pages/tags in (I have mine stored in a "relevance tags" folder that's in a folder titled "under the hood"). The queries you'll find on this page are written to work with pages that have the following names:
- relevance - high
- relevance - medium
- relevance - low
After creating these pages, you'll never have to type out their titles in full since as soon as you type two left square brackets ([[) and then "rel," Obsidian's autosuggest feature will likely display all three of them as options to select.
If you prefer to use as your relevance-level tags, say, [[r1]], [[r2]], and [[r3]], go ahead and create pages with those titles (minus the square brackets) and then make sure that you change the query language shown in the next section below so that, for instance, "relevance - high" is replaced with "r1," "relevance - medium" is replaced with "r2," and so on.
If you want to use regular tags as your relevance-level tags—#relevance_high or #r1 and so on—feel free to do so. You'll then just need to learn what query language to use to get your queries to search for lines containing both (a) a page representing a particular idea and (b) a relevance tag in the form of a regular tag (the page on search from the Obsidian Help website is a place to start).
2. Create a template to put the queries on
When using templates in Obsidian, you have two plug-ins to choose from:
a. the Templates core plug-in
b. the Templater community plug-in
The Templater plug-in is vastly superior to the Templates one, but some people prefer or need to use only core plug-ins with Obsidian, so below I have provided instructions for using each.
a. TEMPLATES (core plug-in)
Below are the steps to follow for using the Templates plug-in to set things up for RLT.
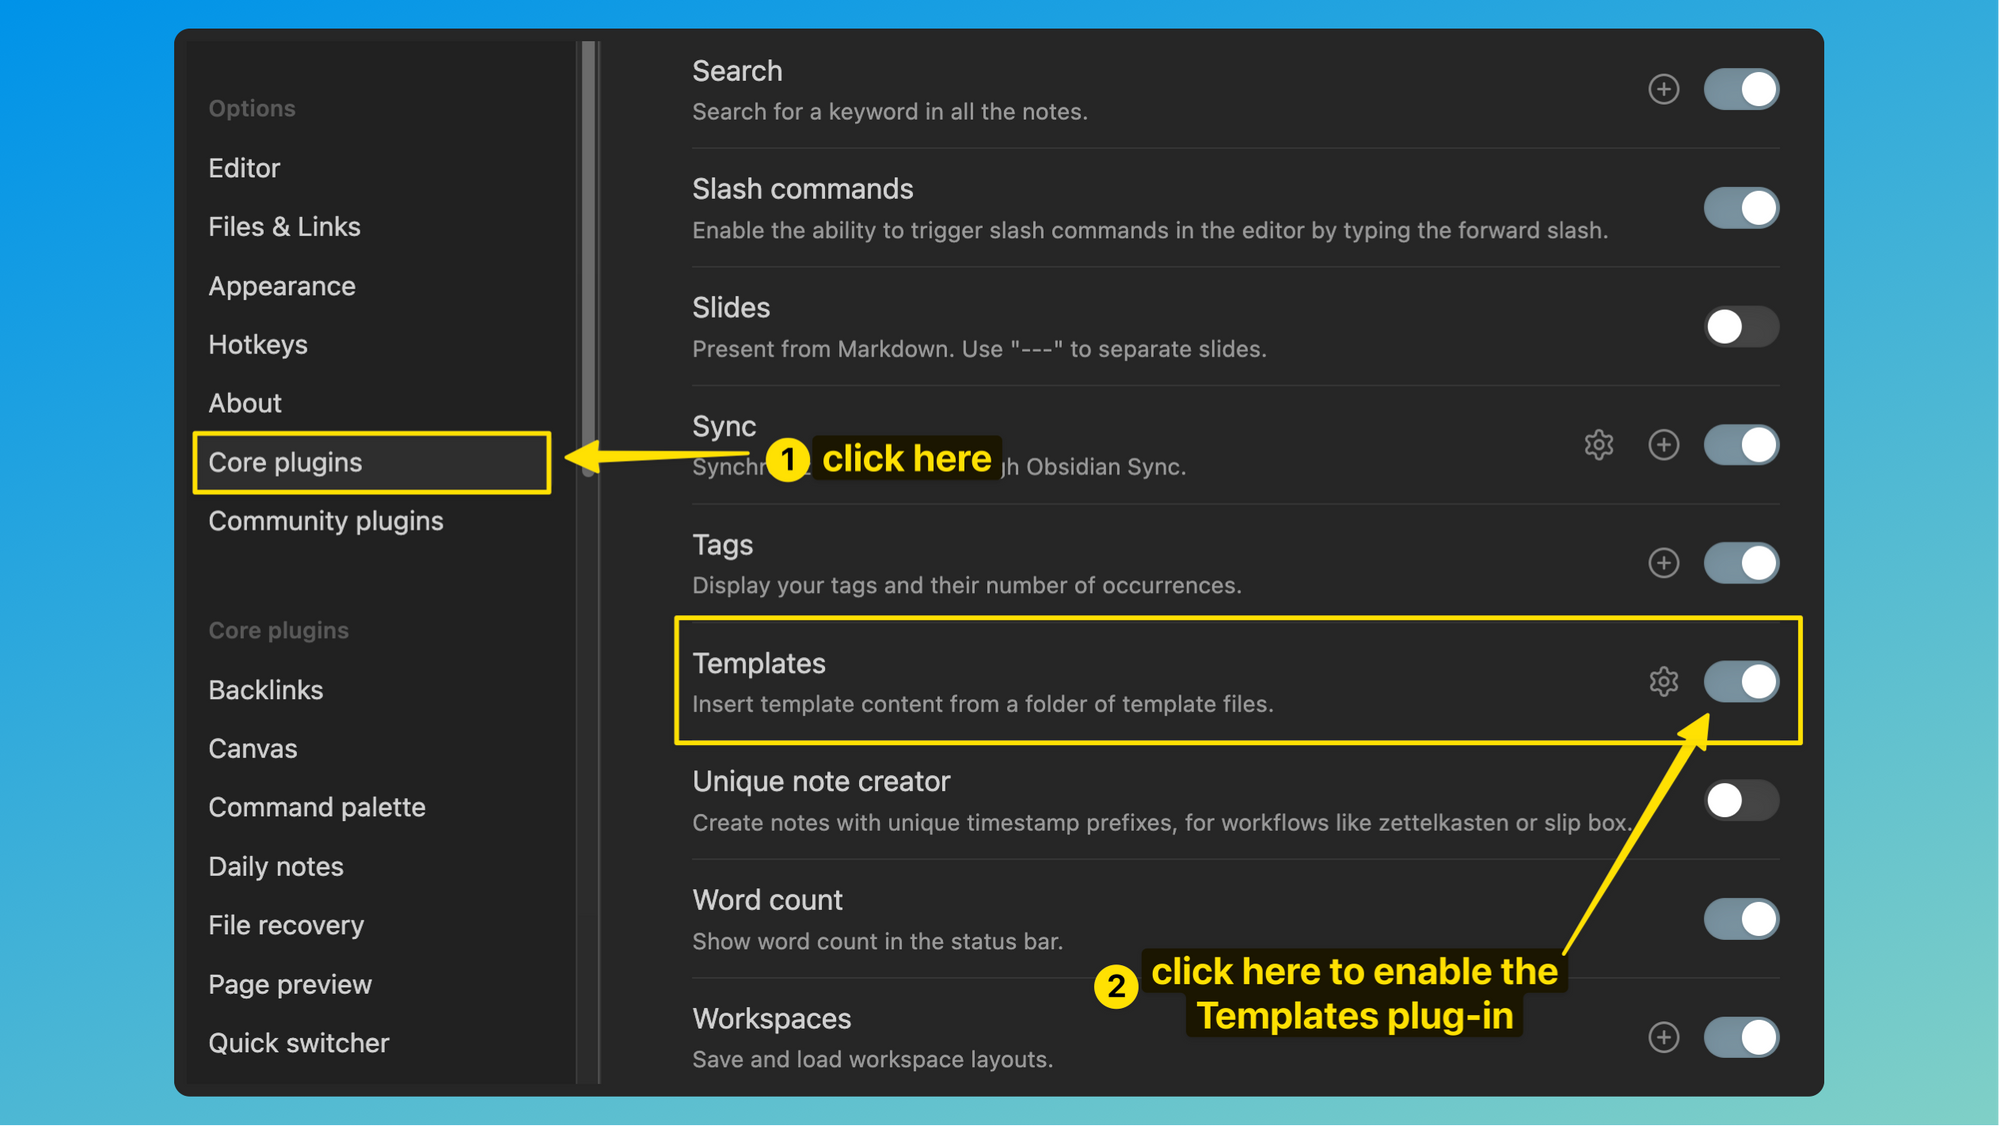
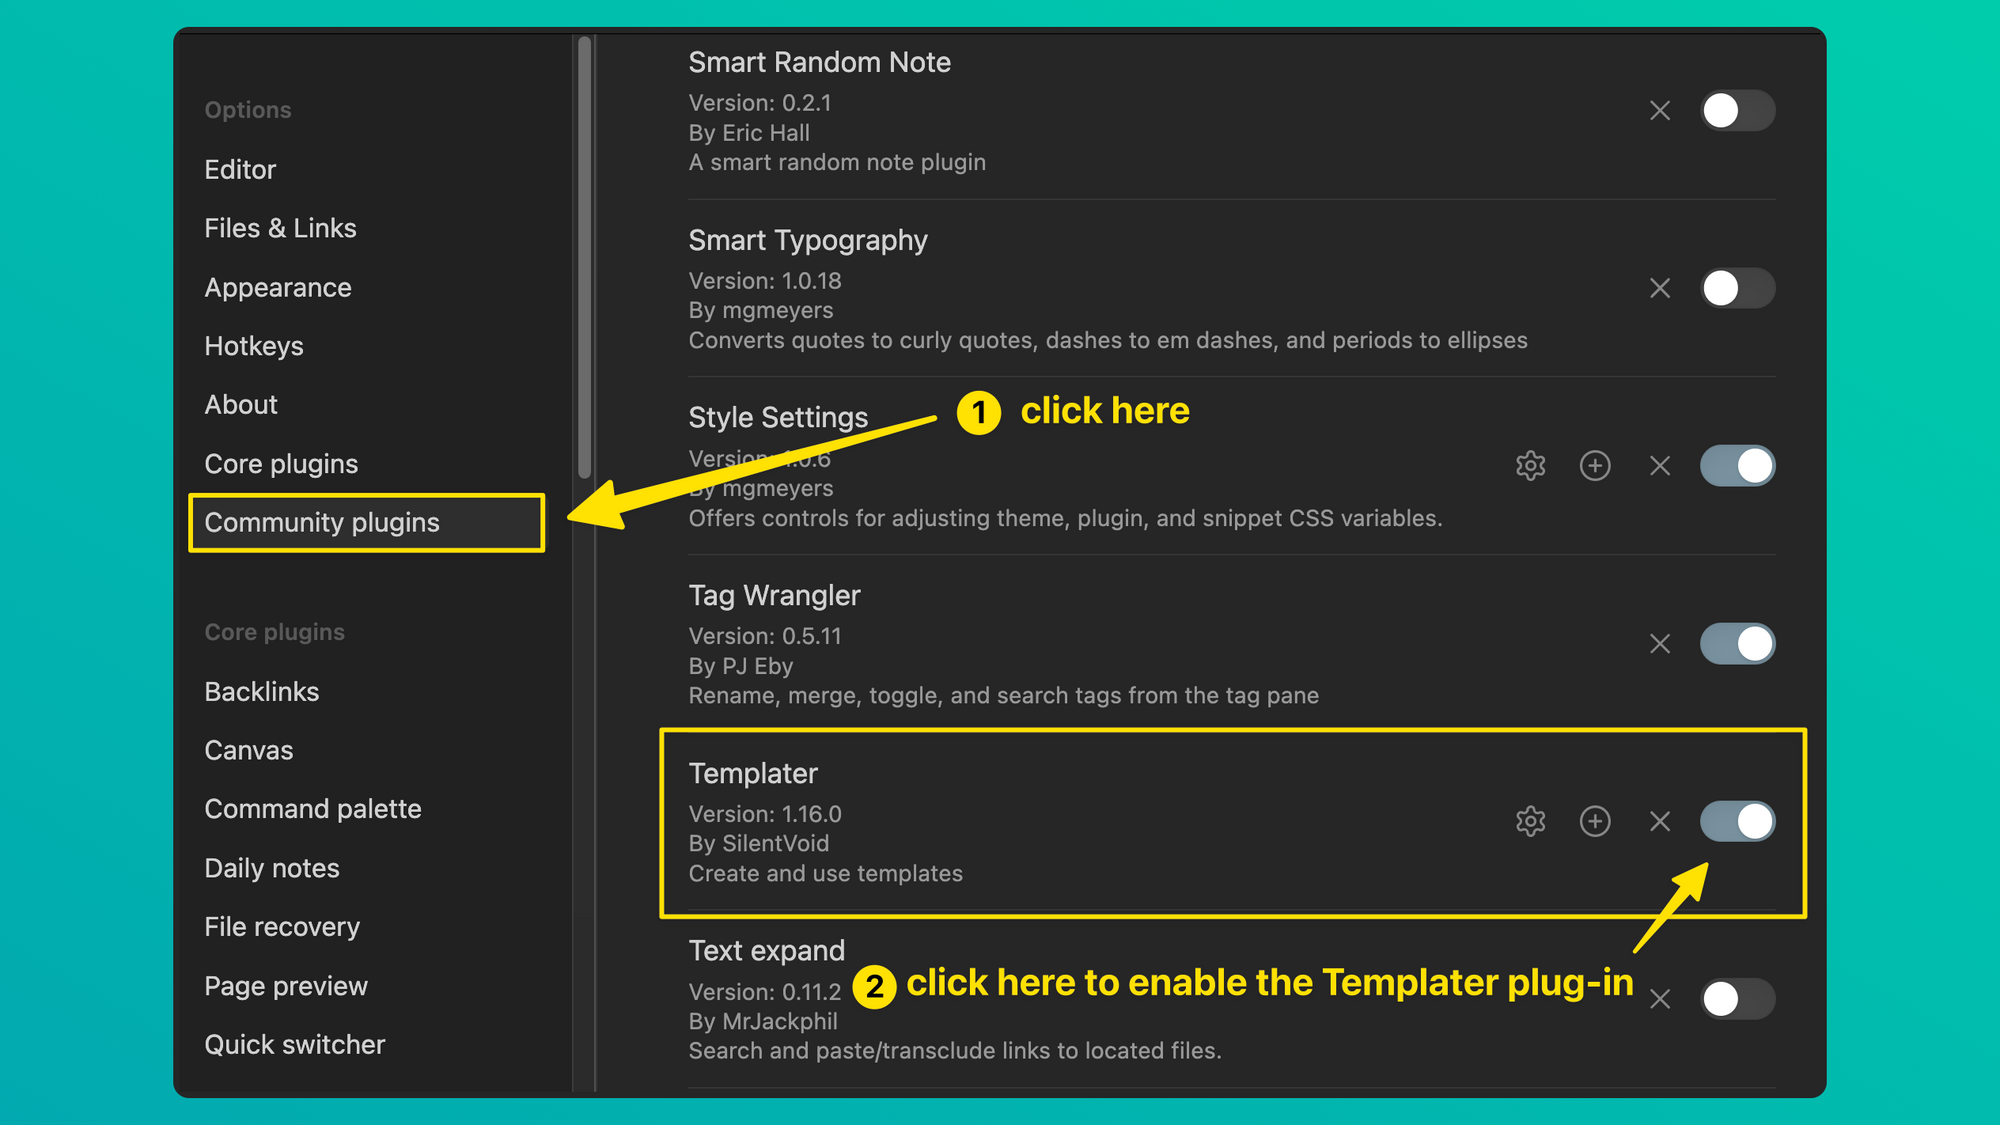
a1. Enable the Templates plug-in
Go into Obsidian's Settings page and enable the Templates plug-in.
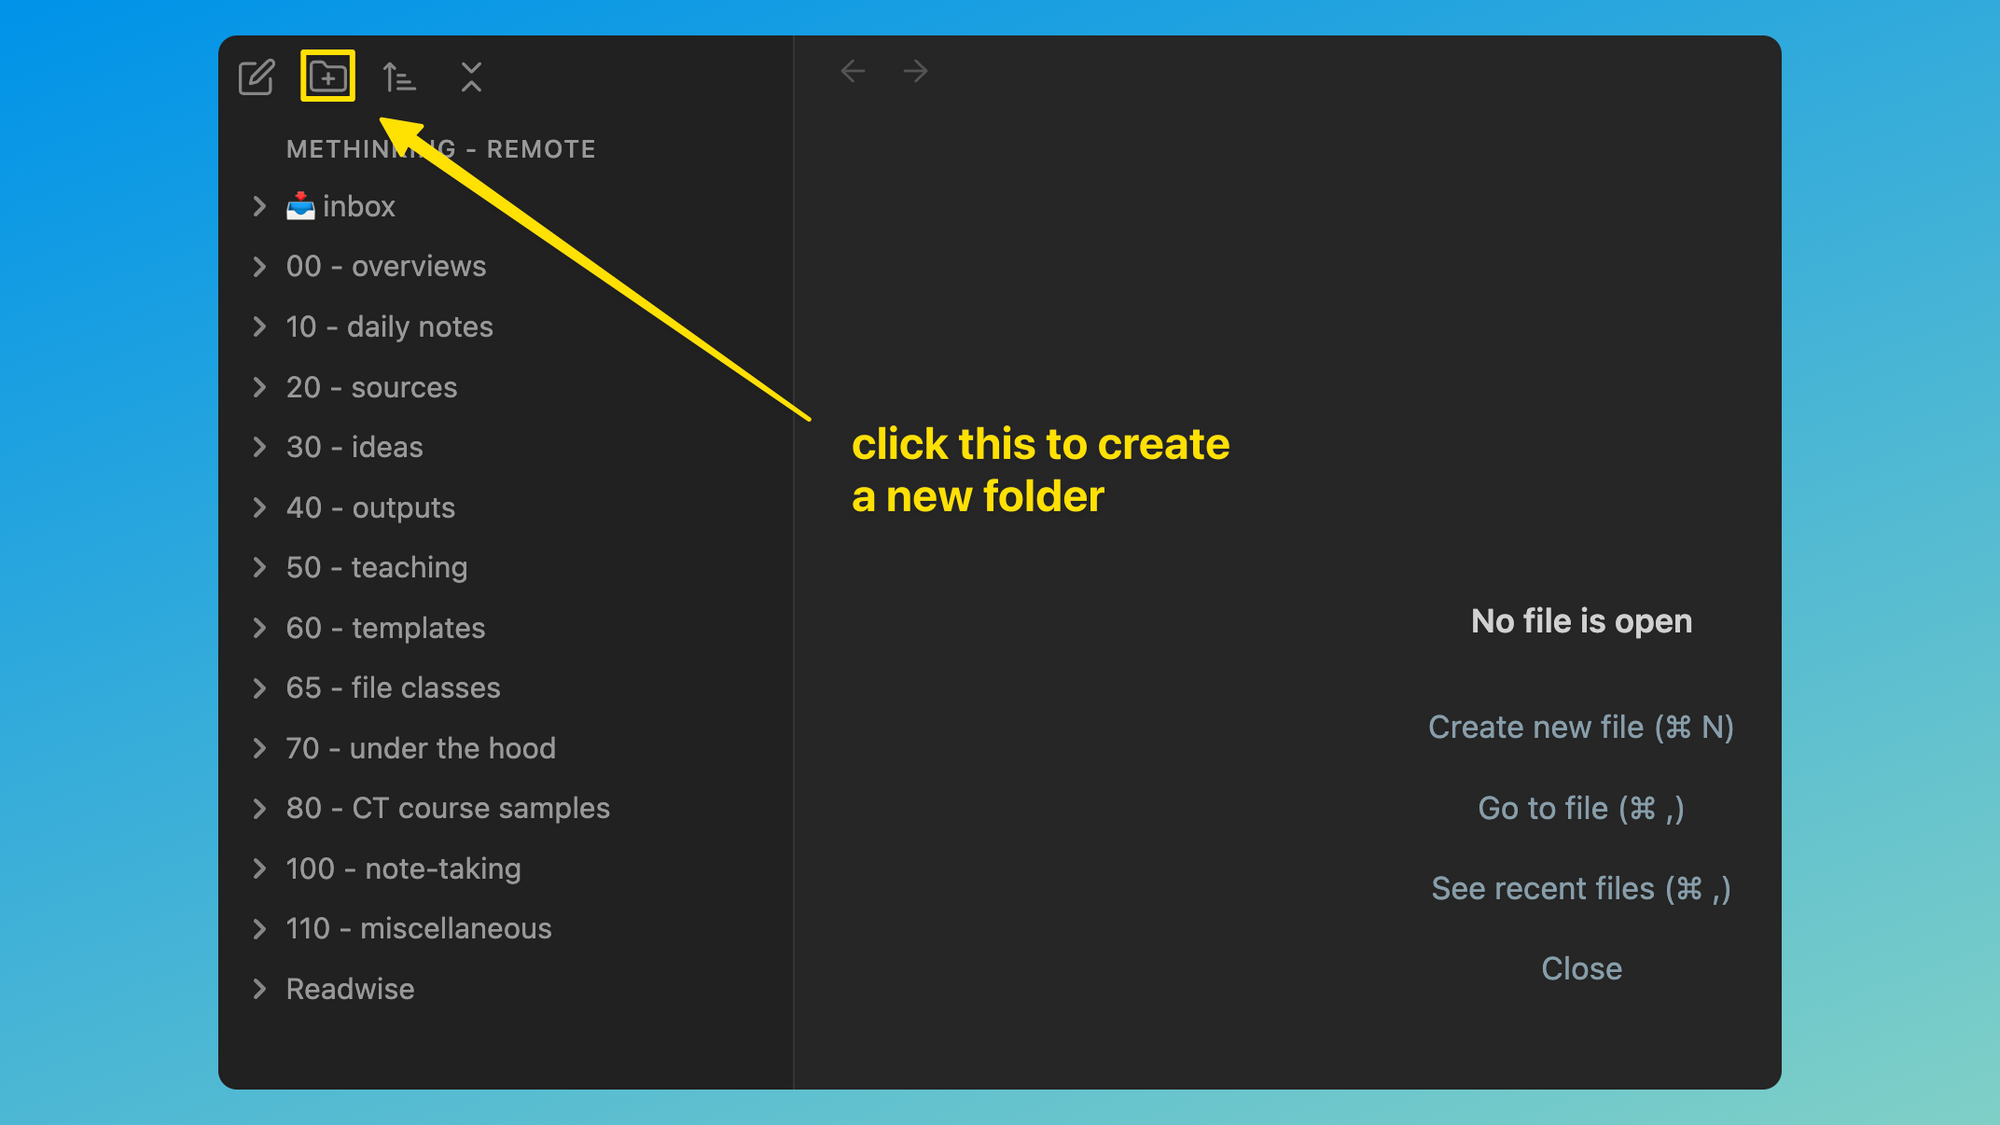
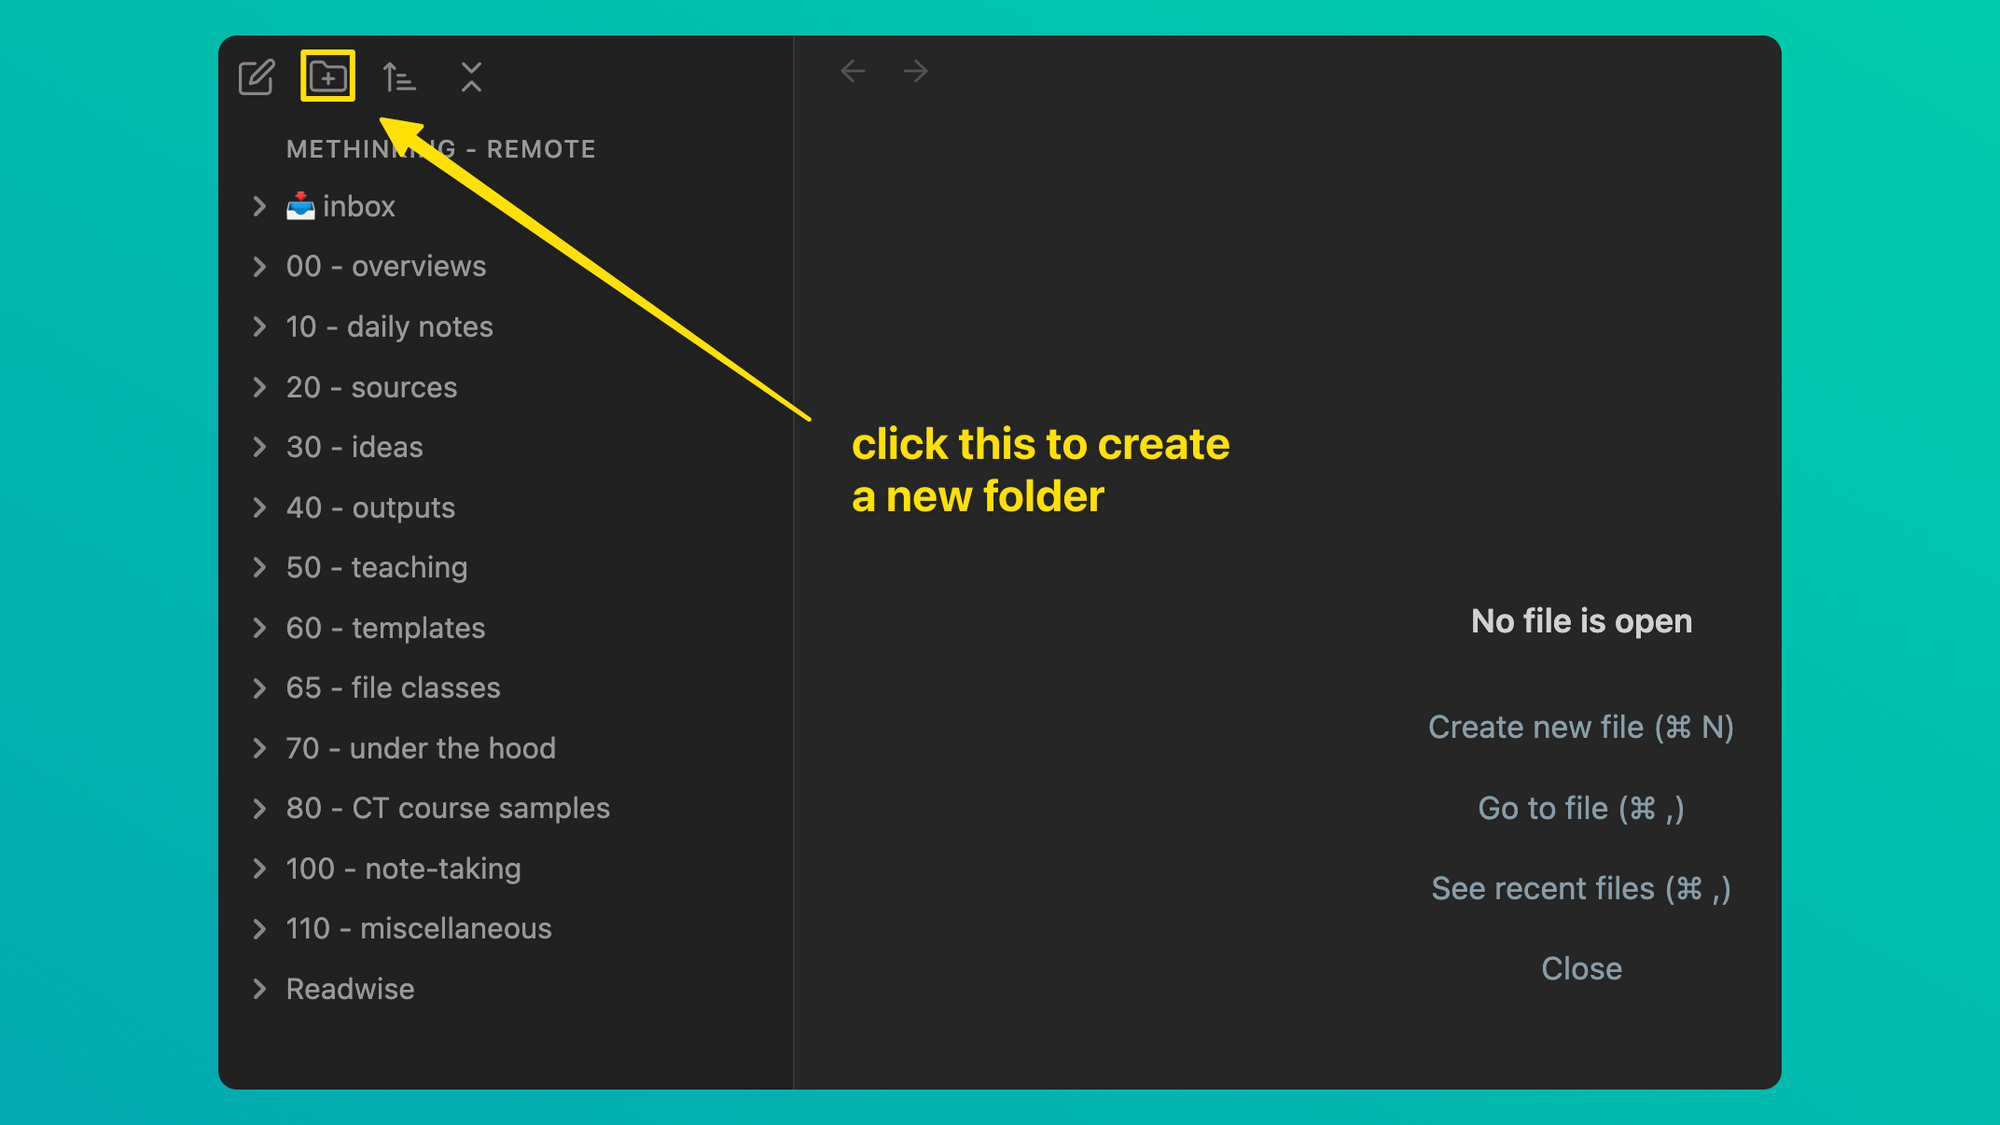
a2. Create a folder for storing your templates
Once you have gone into Settings and enabled the Templates plug-in, you need to make sure to create a folder in your vault where you will be keeping your templates.
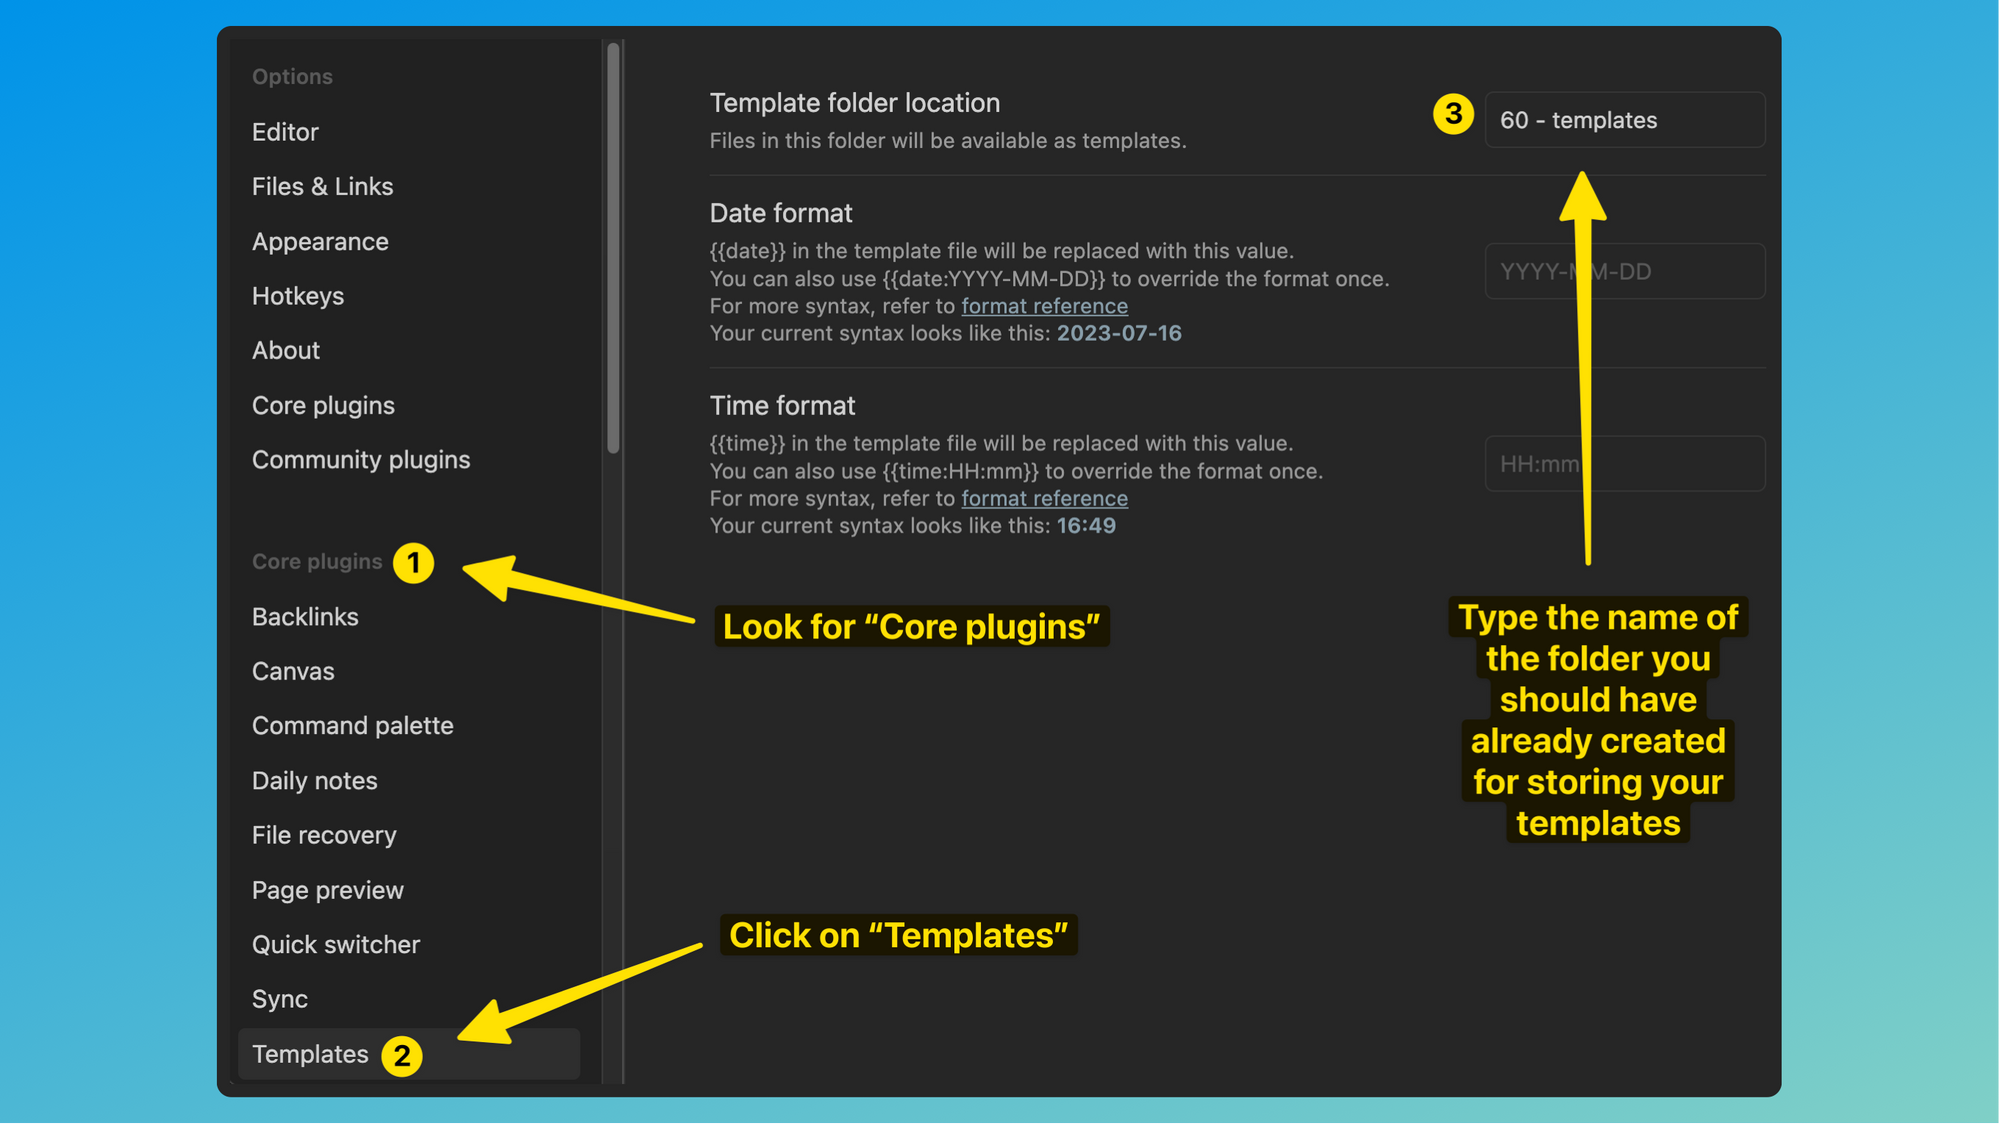
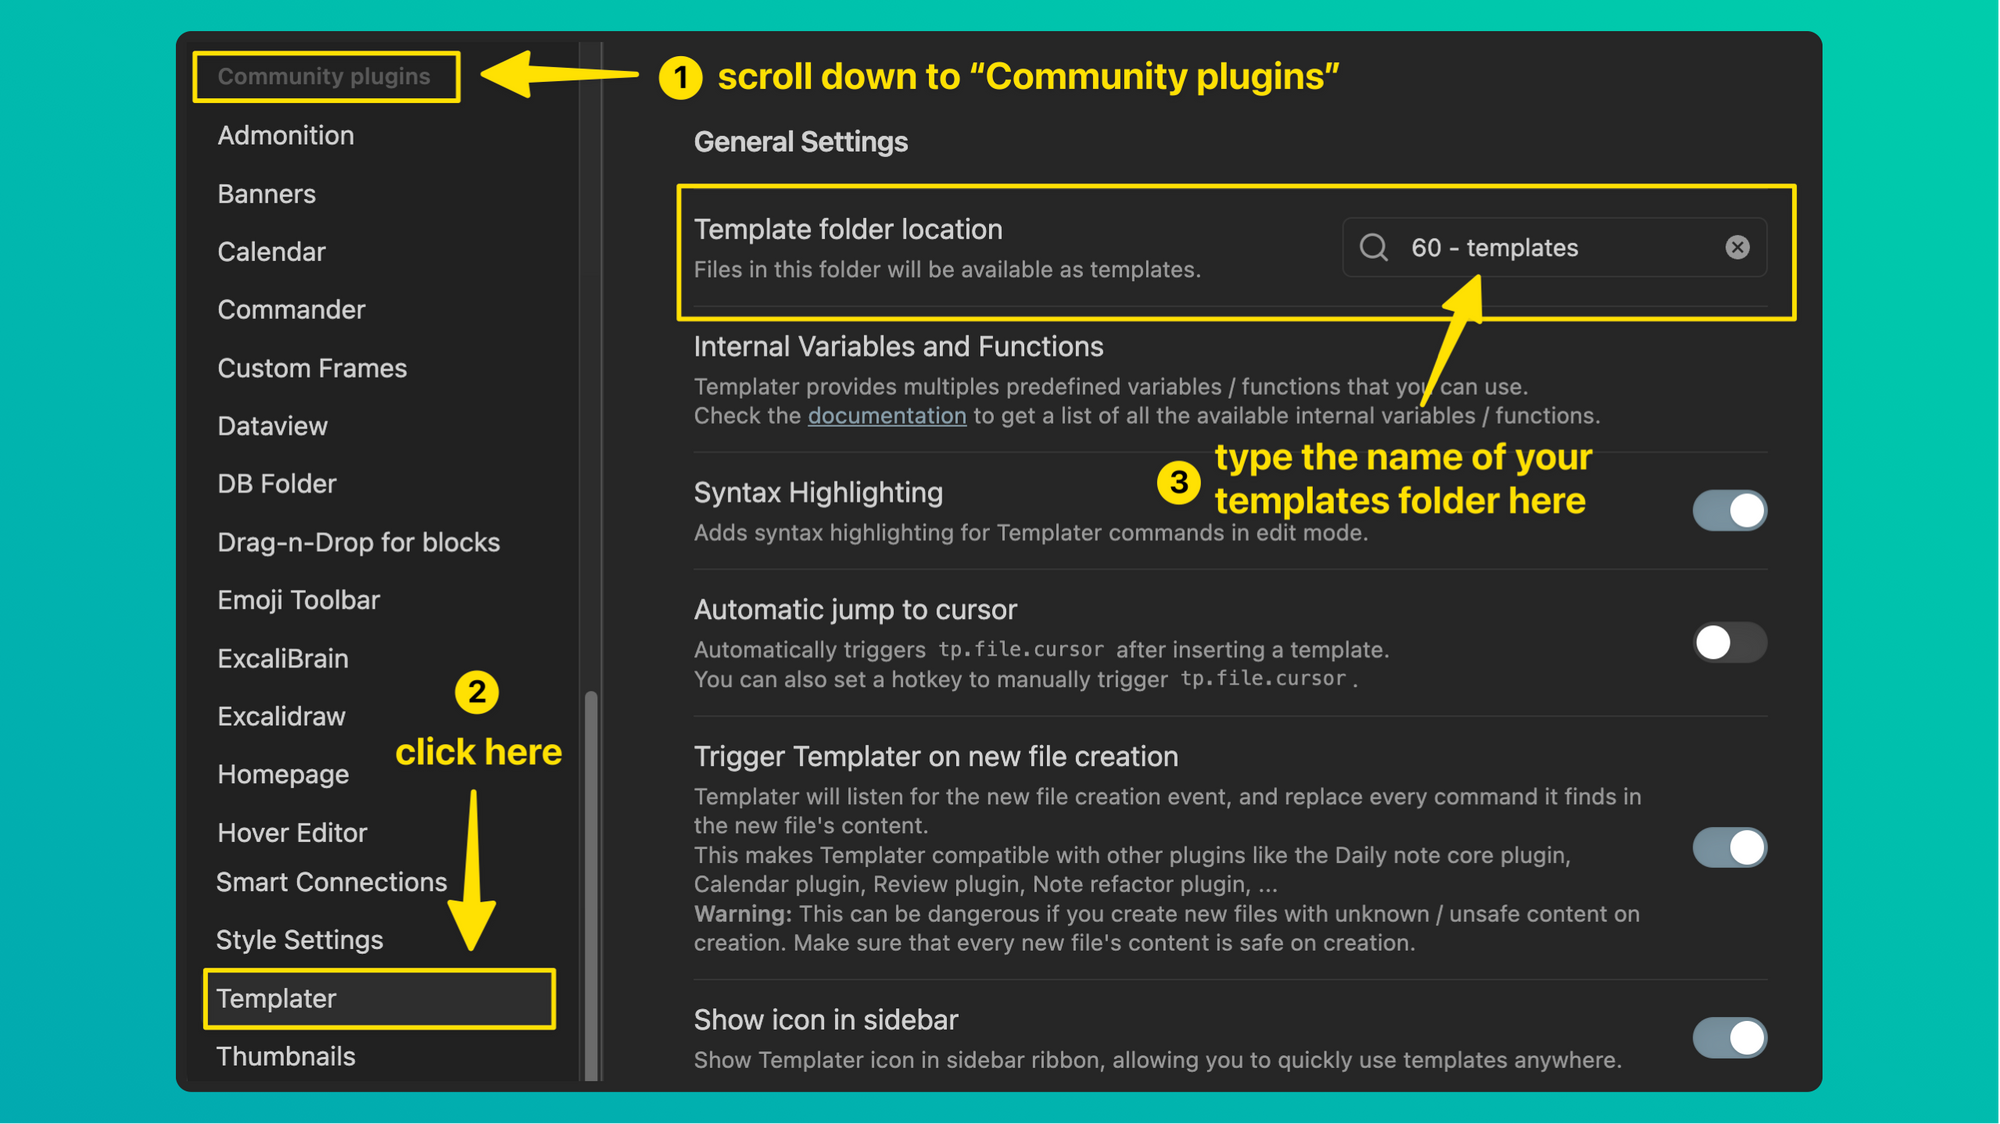
a3. Enter the name of your templates folder in the "Template folder location" spot on the Templates settings page
The next thing to do is stated towards the top of the "Templates" Obsidian Help page, the relevant part of which is below.

Below is a breakdown of Step 2 that you see in the screenshot above.
Warning: if you ever change the name of your templates folder, you will need to come back into the Templates settings page and put the new name in. If you don't do that, then when you try to invoke a template, Templates will produce an error message saying it can't find the template.
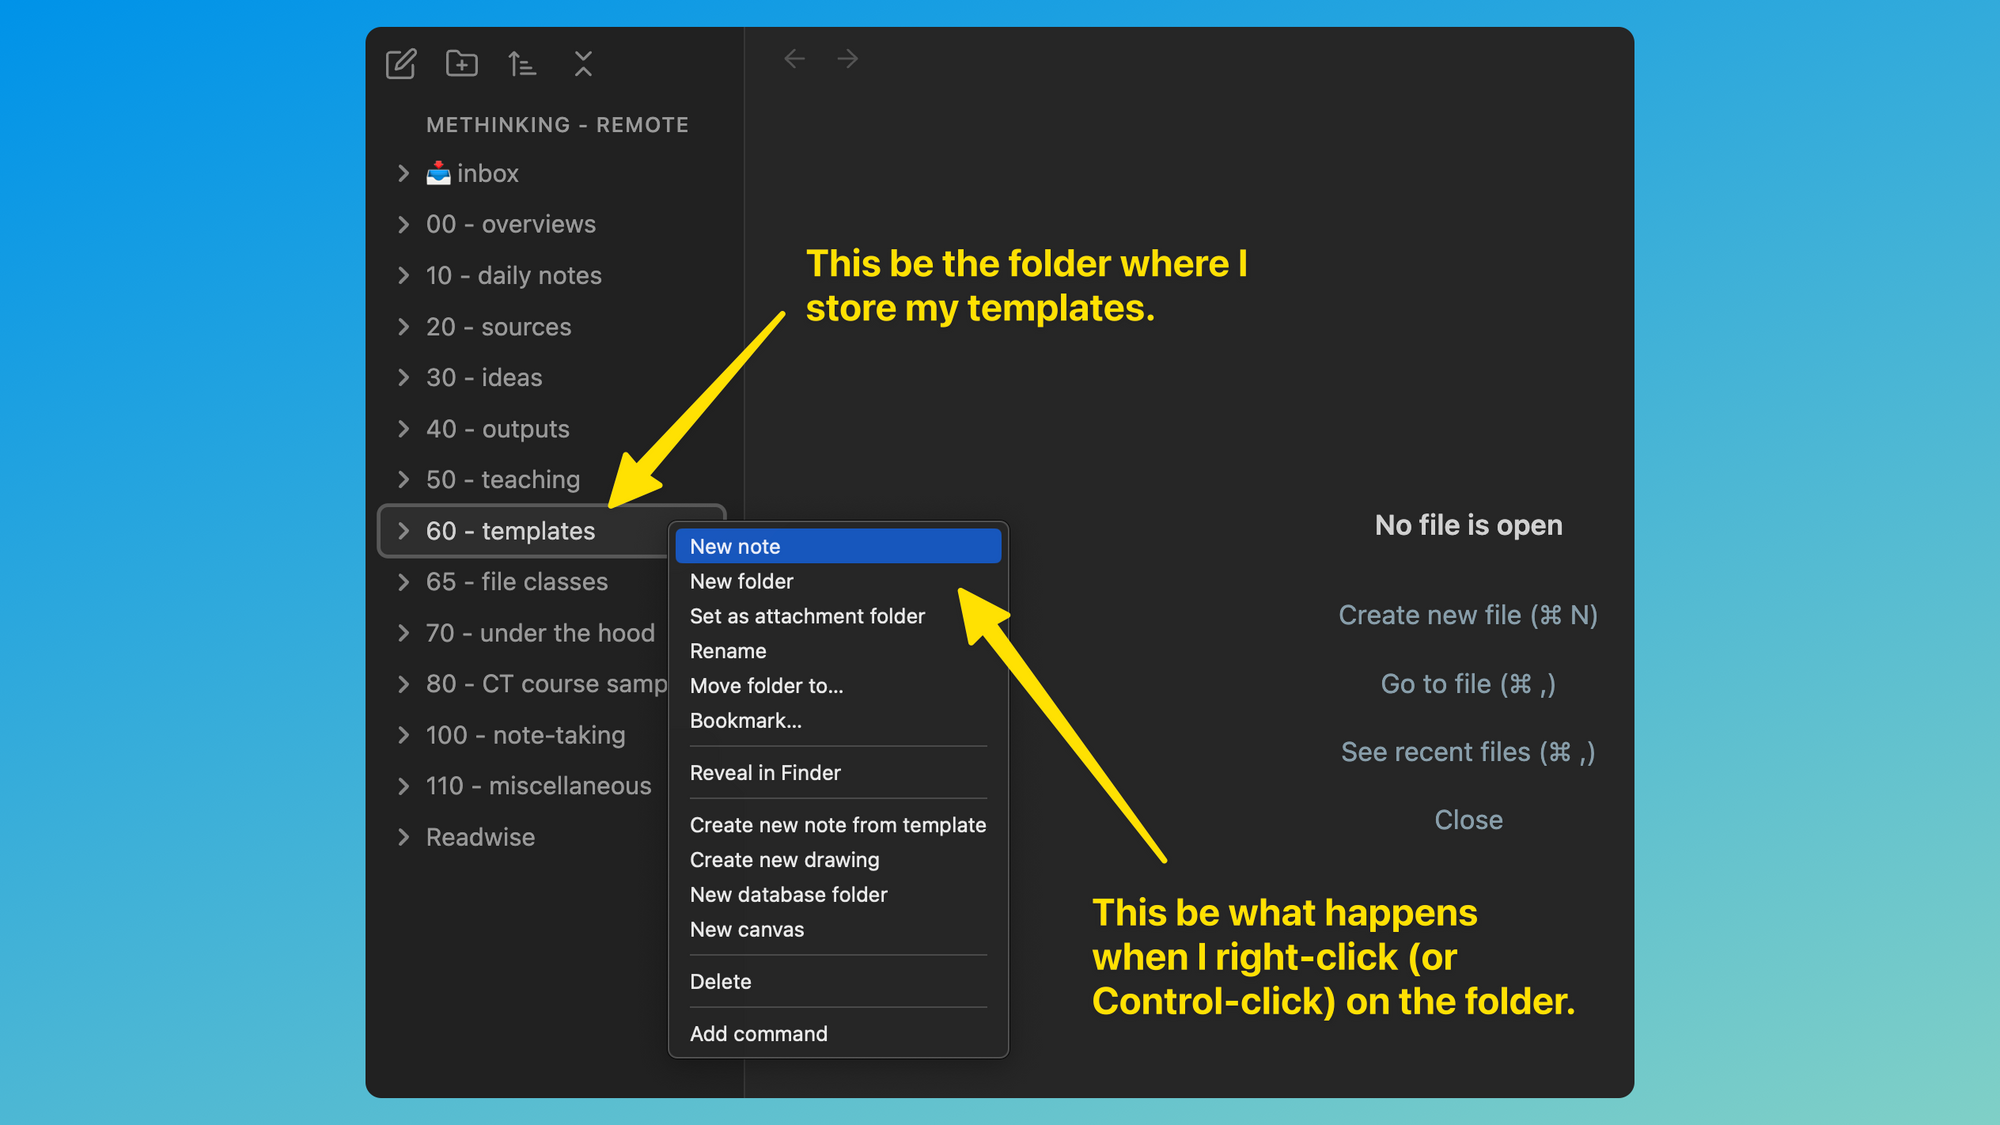
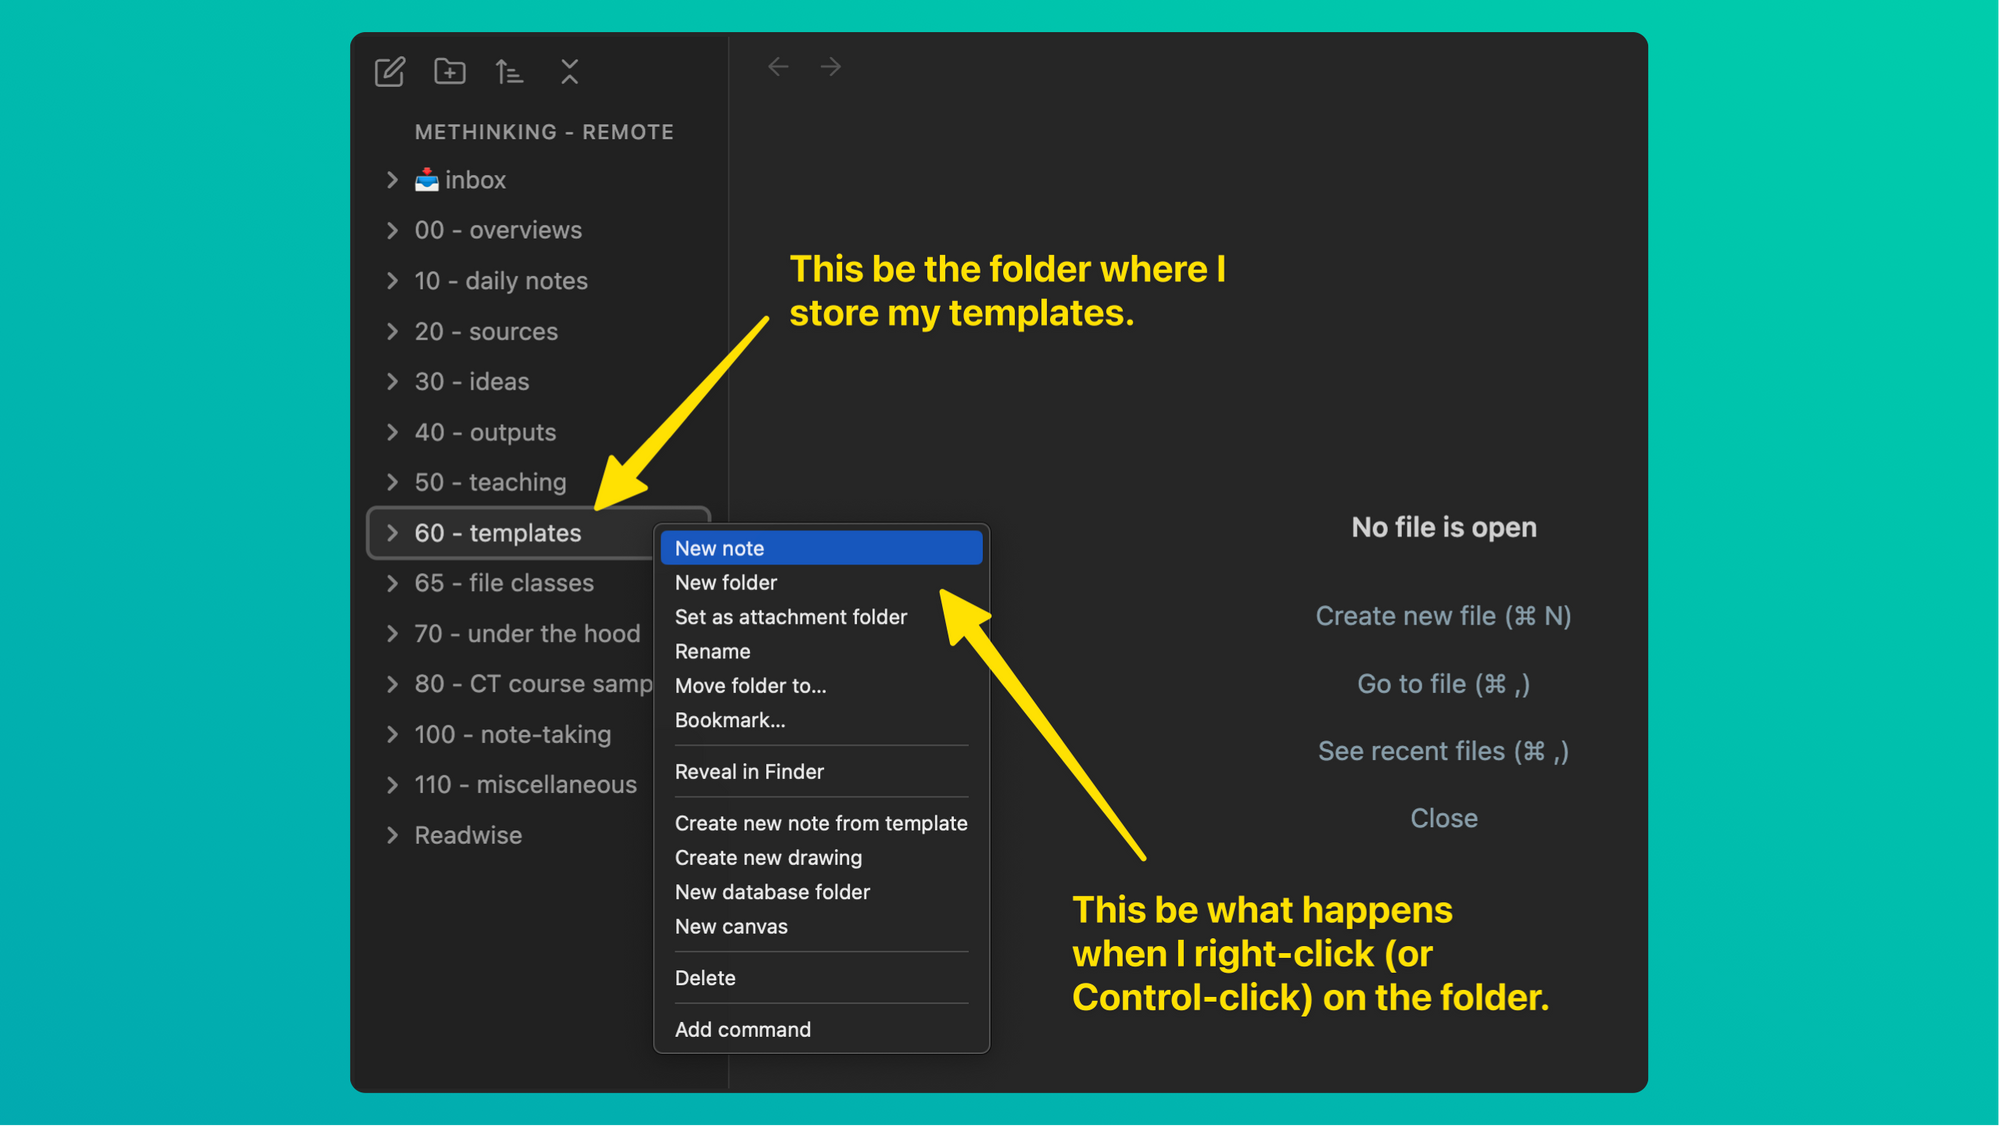
a4. Right-click on your templates folder to create a new template
To create your first template, close Settings (hit the "x" at the top right of the Settings window), right-click (or Control-click) on the templates folder you recently created, and select "New note." Here's what right-clicking on the templates folder looks like in my own vault:
a5. Give the new template a name
Give a title to the document, such as "tag page template."
a6. Add the queries to the template
Add the queries to the document (see 2. The Queries to add to your template below).
For more instructions on how to use the Templates plug-in, click on the "Templates" Obsidian Help page below.
b. TEMPLATER (community plug-in)
Below are the steps to follow for using the Templater plug-in to set things up for RLT.
The very first thing to do is install the Templater plug-in. I assume here that you already know how to do that. If you don't, click on the "Community plugins" Obsidian Help page page below.
b1. Enable the Templater plug-in
Go into Obsidian's Settings page and enable the Templater plug-in.
b2. Create a folder for storing your templates
Once you have installed the Templater plug-in and enabled it in Settings, you need to make sure to create a folder in your vault where you will be keeping your templates.
b3. Enter the name of your templates folder in the "Template folder location" spot on the Templater settings page
Warning: if you ever change the name of your templates folder, you will need to come back into the Templater settings page and put the new name in. If you don't do that, then when you try to invoke a template, Templater will produce an error message saying it can't find the template.
b4. Right-click on your templates folder to create a new template
To create your first template, close Settings (hit the "x" at the top right of the Settings window), right-click (or Control-click) on the templates folder you recently created, and select "New note." Here's what right-clicking on the templates folder looks like in my own vault:
b5. Give the new template a name
Give a title to the document, such as "tag page template."
b6. Add the queries to the template
Add the queries to the document (see 2. The Queries to add to your template below).
For more instructions on how to use the Templater plug-in, go to the Templater website.
3. The queries to add to your template
This section goes over the following:
a. what the query language tells Obsidian to do
b. the query language to use
c. a line you might want to add to the queries
d. where on your template to put the query language
e. what to do if you change the title of a page that appears in a query
a. What each line of the query tells Obsidian to do
Below is the query language to use for a "relevance - high" query using the Templater community plug-in.
```query
line:("<% tp.file.title %>" "relevance - high")
file:-"<% tp.file.title %>"
```
Here's what each line of the query is telling Obsidian to do:
- The first line, containing three backticks and the word query, tells Obsidian, "I'm making a query."
- Once you have given a title to a new document and activated your template,
"<% tp.file.title %>"will get replaced with the title of that document. If the title of the document is "libertarian freedom," then this second line of the query will be telling Obsidian to search your vault for anylinethat contains both (a) the term "libertarian freedom" and (b) the term "relevance - high." (Why not useblockinstead ofline? In my experience, you get the same search result for both of those. The reason I don't useblockis that I read the following on this Obsidian help page: "Sinceblock:requires Search to parse the Markdown content in every file, it can cause your search term to take longer time to finish." - The third line tells Obsidian not to return as a search result the document the query is on ("not" is signified by the hyphen, which functions as a minus sign). That's because the whole point of the queries I'm laying out here is to pull information and links from other pages in your vault into the page containing the query (the page that represents a particular idea). What I don't want the query to do is return itself as a search result (without line 3, it would do this since the query language contains the very terms the query is searching for).
- The last line, consisting of three backticks, tells Obsidian, "Them's your orders. Over and out."
b. The query language to use
The query language to use depends on whether you want to use the Templates core plug-in or the Templater community plug-in, though the only difference is that where Templates uses {{title}}, Templater uses <% tp.file.title %>.
Queries to use with the Templates core plug-in
relevance - high
```query
line:("{{title}}" "relevance - high")
file:-"{{title}}"
```
relevance - medium
```query
line:("{{title}}" "relevance - medium")
file:-"{{title}}"
```
relevance - low
```query
line:("{{title}}" "relevance - low")
file:-"{{title}}"
```
Queries to use with the Templater community plug-in
relevance - high
```query
line:("<% tp.file.title %>" "relevance - high")
file:-"<% tp.file.title %>"
```
relevance - medium
```query
line:("<% tp.file.title %>" "relevance - medium")
file:-"<% tp.file.title %>"
```
relevance - low
```query
line:("<% tp.file.title %>" "relevance - low")
file:-"<% tp.file.title %>"
```
c. One other line you might want to add
Update (2023-11-03): do NOT follow the advice in this section, as doing so will make it so that your queries don't return results. Replacing "folder" with "path" might help?
If you end up creating more than one template that contains the query language that's above, then the relevance-level query sections of those templates—as they are prior to being activated—are going to return as results any other template containing the search terms listed after "line."
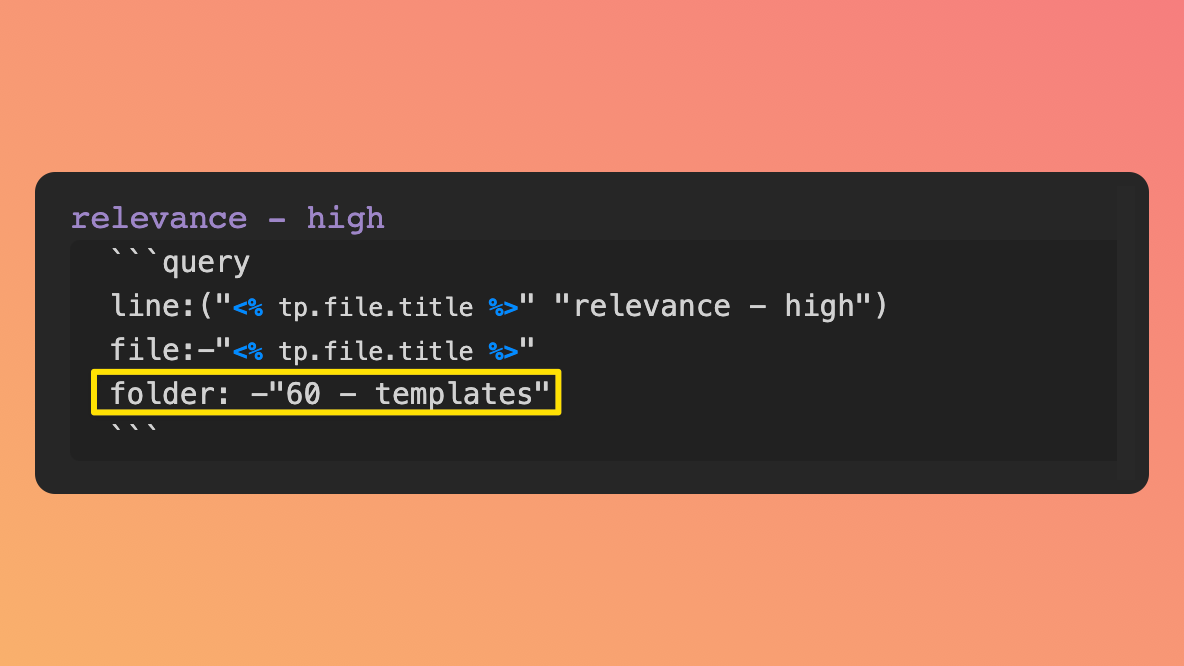
If that annoys you, you can add one other line to each query: folder: -"title of your templates folder" (the "-" is a hyphen functioning as a minus sign). That line tells the query not to return as a result any file that's located in your templates folder. Since my templates folder is titled 60 - templates, that's what I would put after "folder: -", as you can see below.
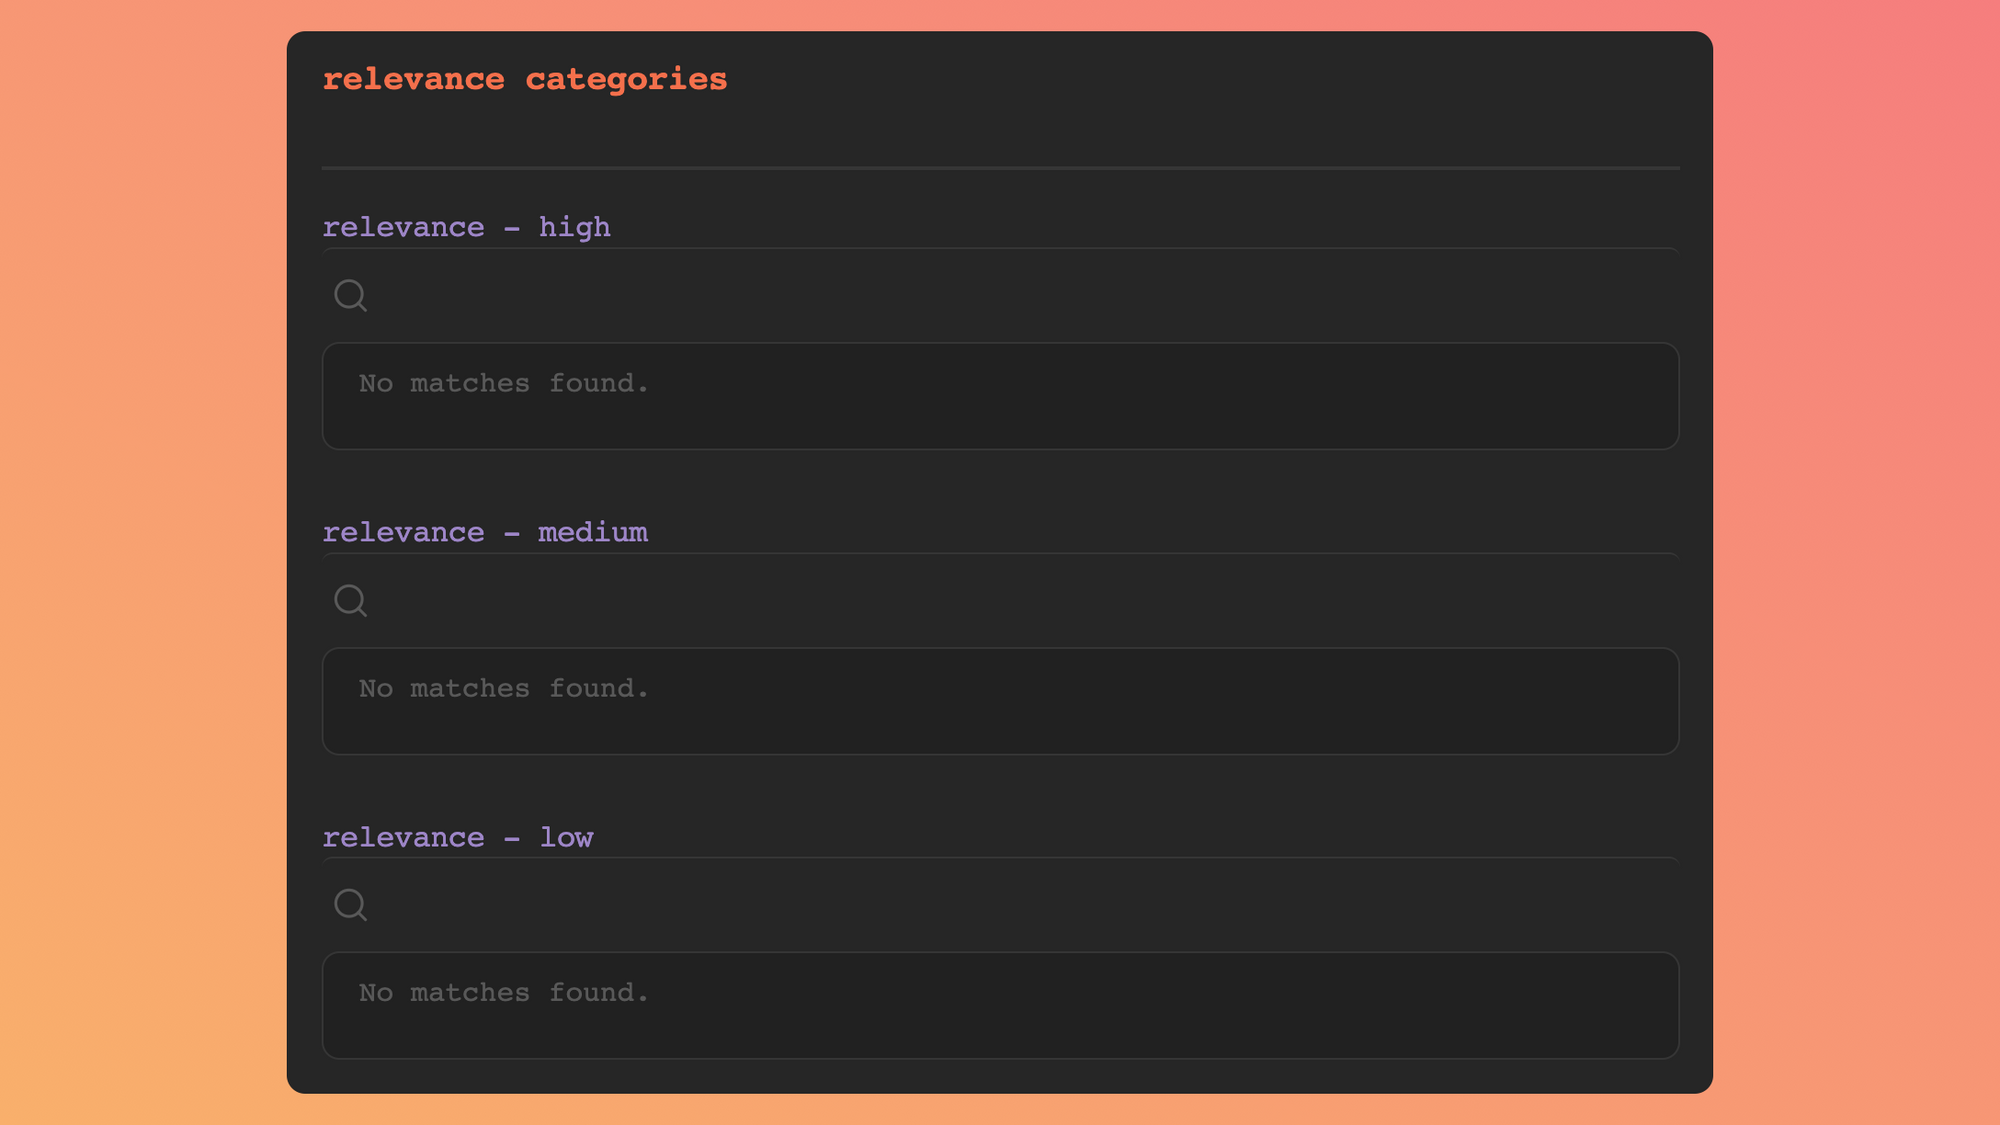
d. Where to put the queries
You can place the queries wherever you want in a document (except up in the YAML—if you're using YAML). As you can see below, I place mine in a section titled "relevance queries."
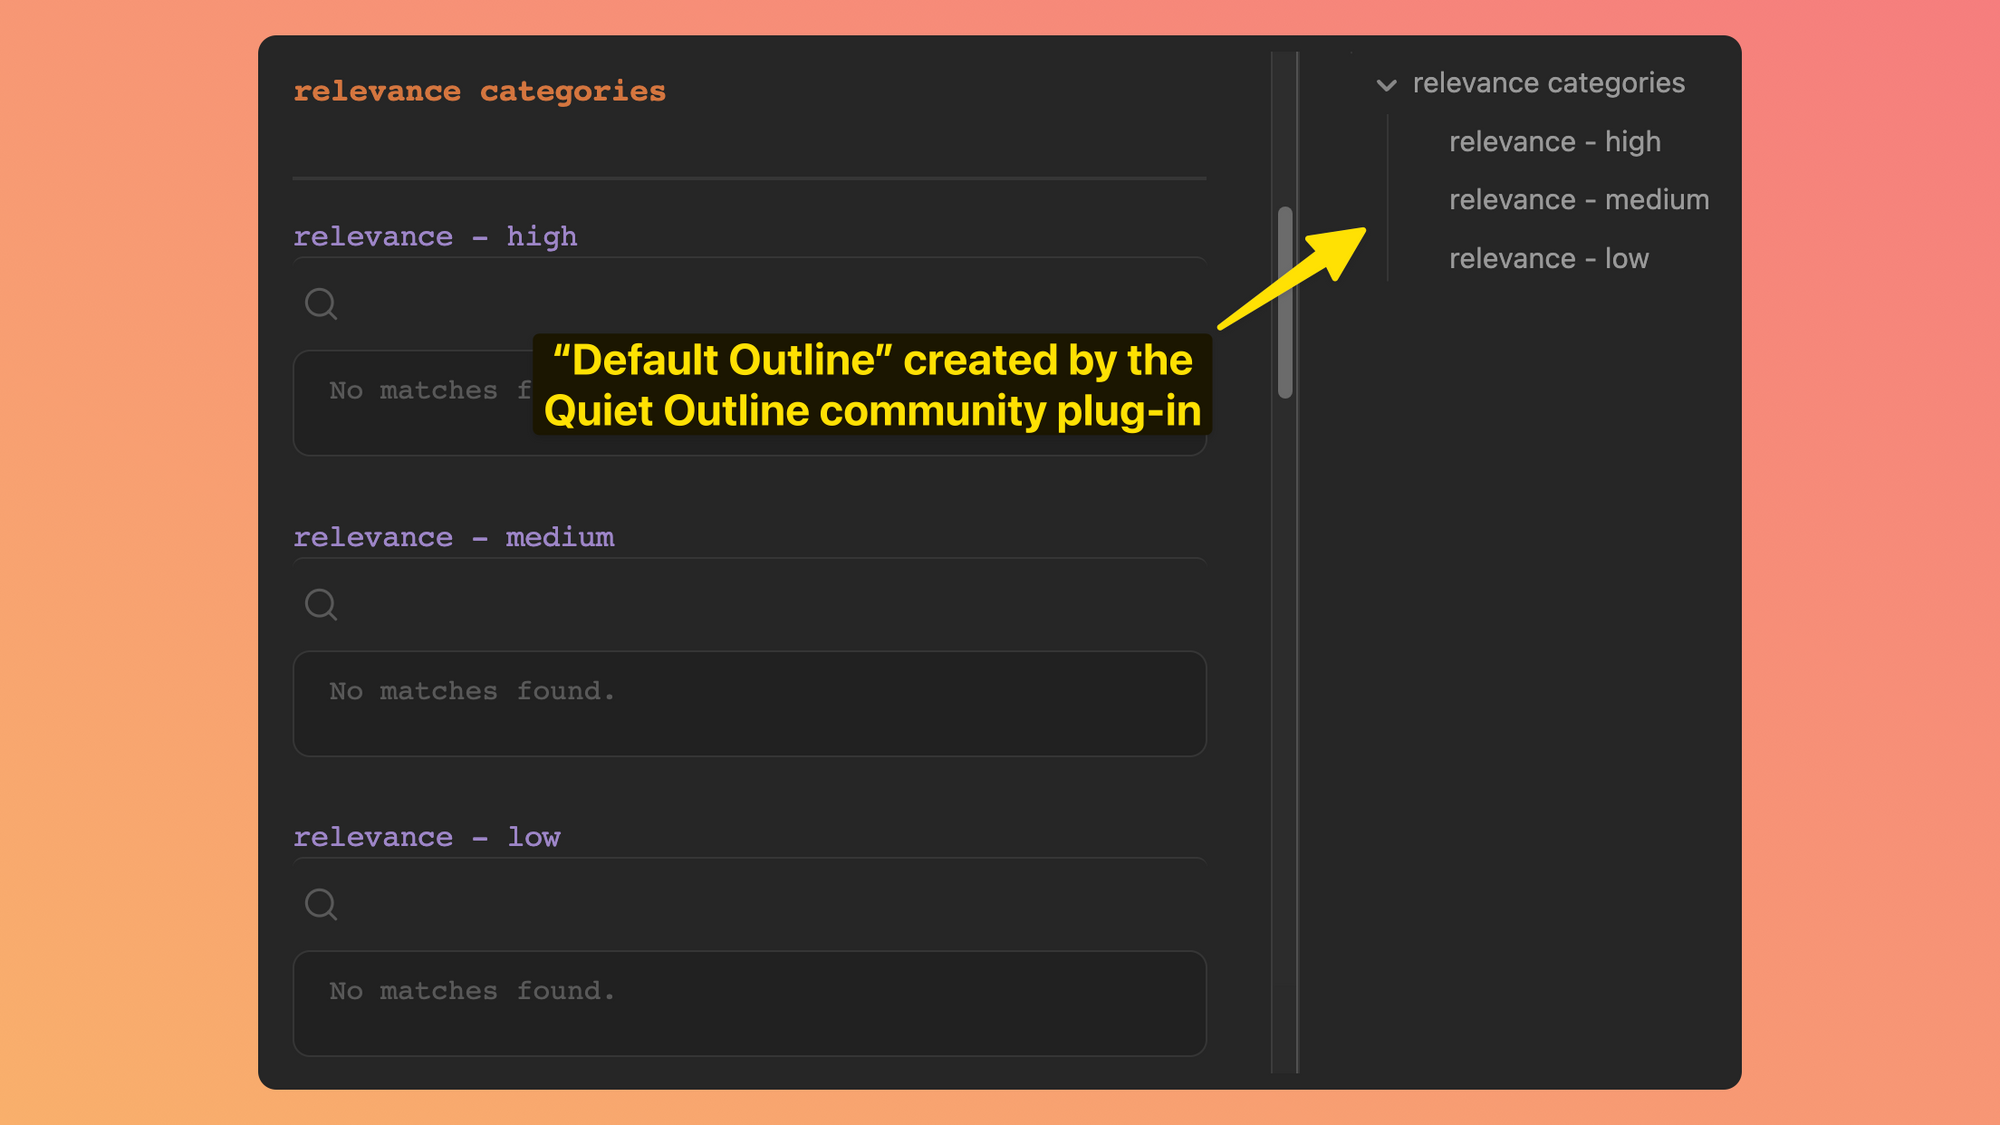
In case you're curious, the "relevance categories" heading on my pages is a Level 1 heading, whereas above each query is a Level 3 heading (the ones in purple). I do this so that the Level 3 headings (which could just as well be Level 2 ones) are indented beneath the Level 1 heading in the Default Outline panel created by the Quiet Outline community plug-in (shown below).
e. What to do if you change the title of a page that appears in a query
One thing that's totally awesome about apps like Obsidian is that when you change the title of a page, every instance of a reference to that page is automatically updated to match the change. Unfortunately, the titles of pages that appear in the queries do not also get updated (at least if you're using the query language I have provided above).
This means you have to manually update them, but there's a fairly quick way to do this: use the "Replace all" feature in Obsidian. Instructions on how to use this feature can be found here.
Note: if anyone knows how to modify the queries—perhaps with some fancy Dataview-related Javascript—so that the search term that consists of a page title (or file name) gets updated when the title of that page is changed, please let us know in the comments section at the bottom of this page.
4. Applying relevance-level tags to material in your vault
Applying relevance-level tags to material in your vault is simple:
- Identify a piece of information in your vault that you want to associate with a particular idea.
- At the end, beginning, or somewhere within the block of information, type a link to the name of the page representing the idea you want to associate the information with.
- Right after that, type the relevance-level tag (that is, a link containing the title of whatever relevance-level page/tag you want to apply to the piece of information).
Below is a screenshot of a passage from an article that I have associated with a tag page—[[amour propre]]—and a relevance-level page/tag.

And below are the search results returned by the "relevance - medium" query on the [[🏷 amour propre]] tag page.
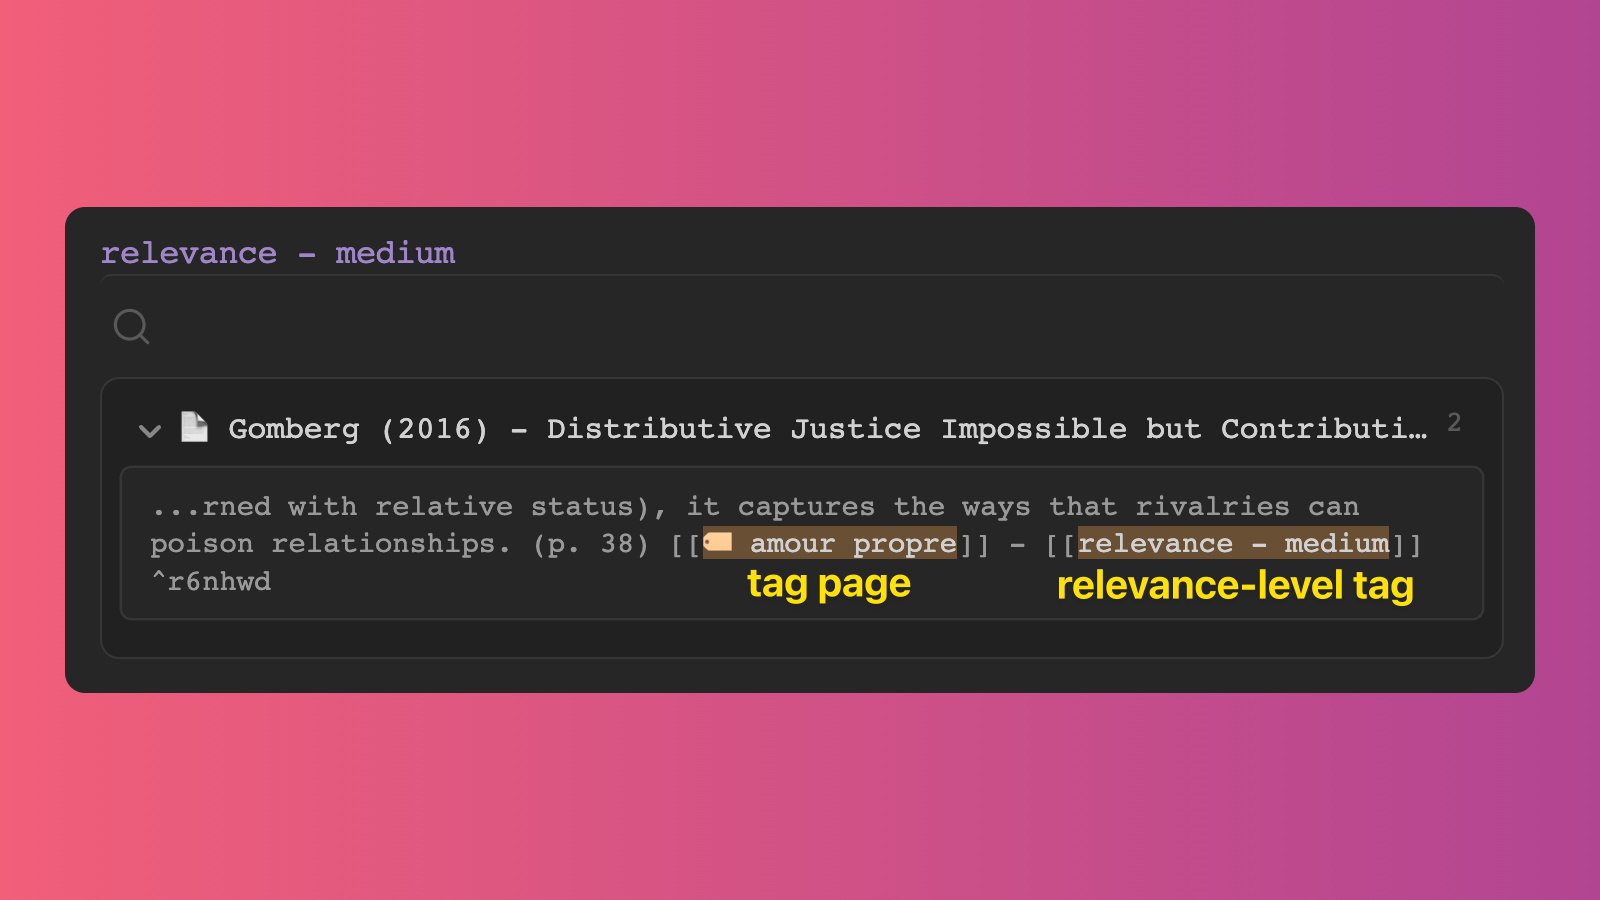
As you can see in the above screenshot, the search result doesn't contain a whole lot of information: it's just the two search terms—the [[tag page]] and the [[relevance-level tag]]—preceded and followed by a couple lines of text.
However, it's easy to disclose more information above and below the search terms. I lay out three of them in the next section.
Applying more than one kind of relevance-level tag to the same block
In some cases, you might want to apply to the same block of information two tag pages but with relevance-level tags of different levels for each. For example, to a block of information you might want to apply not only [[taxes]] and [[relevance - high]] but also [[infrastructure]] and [[relevance - medium]]. If you do this, the block of information you have tagged with [[taxes]] and [[relevance - high]] will show up as a search result not only in the high-relevance section of your [[taxes]] tag page but also in the medium-relevance section.
You have at least two options here.
First, you could apply only the [[relevance - medium]] tag to the block, understanding that when it comes time to work on a specific project and, as part of that work, review the various pieces of information your relevance-level queries have pulled into your [[taxes]] tag page, you're going to look at the search results generated by not just the relevance-high query but also the relevance-medium query (and probably also the relevance-low one).
Second, you could be consistent in how you tag information. For instance, you could always place a relevance-level tag right after the link you want to associate it with: [[taxes]] - [[relevance - high]] - [[infrastructure]] - [[relevance - medium]]. That won't keep the information from getting sucked into two or more different relevance-level queries on the same tag page, but at least when looking at the queries' search results, you will be able to see which relevance-level tag is the one you associated with the tag page in question.
For whatever it's worth, I've been using the first of these two practices, but I might start using the second. However, I don't think it really matters which practice you adopt. The aim of relevance-level tagging is to make it easier to find relevant passages for future work. Sure, it might be annoying to find the same passage returned as a search result in both the high-relevance and low-relevance queries of a tag page, but at that point in the process (that is, working on a writing project), you'll be focused on finding passages that are germane to the writing project at hand, not worrying about whether you correctly marked a passage as of low or high relevance.
5. Different ways of viewing the search results
Below is a screenshot of what a "relevance - medium" section looks like on a page in my vault where the "relevance - medium" query has returned a single search result:

If I want to disclose more information than what is shown above, I have at least three options.
a. Click on the up and down arrows
However, it's easy to disclose more information: simply click on the up and down arrows that get disclosed when you hover your cursor over the block of text.
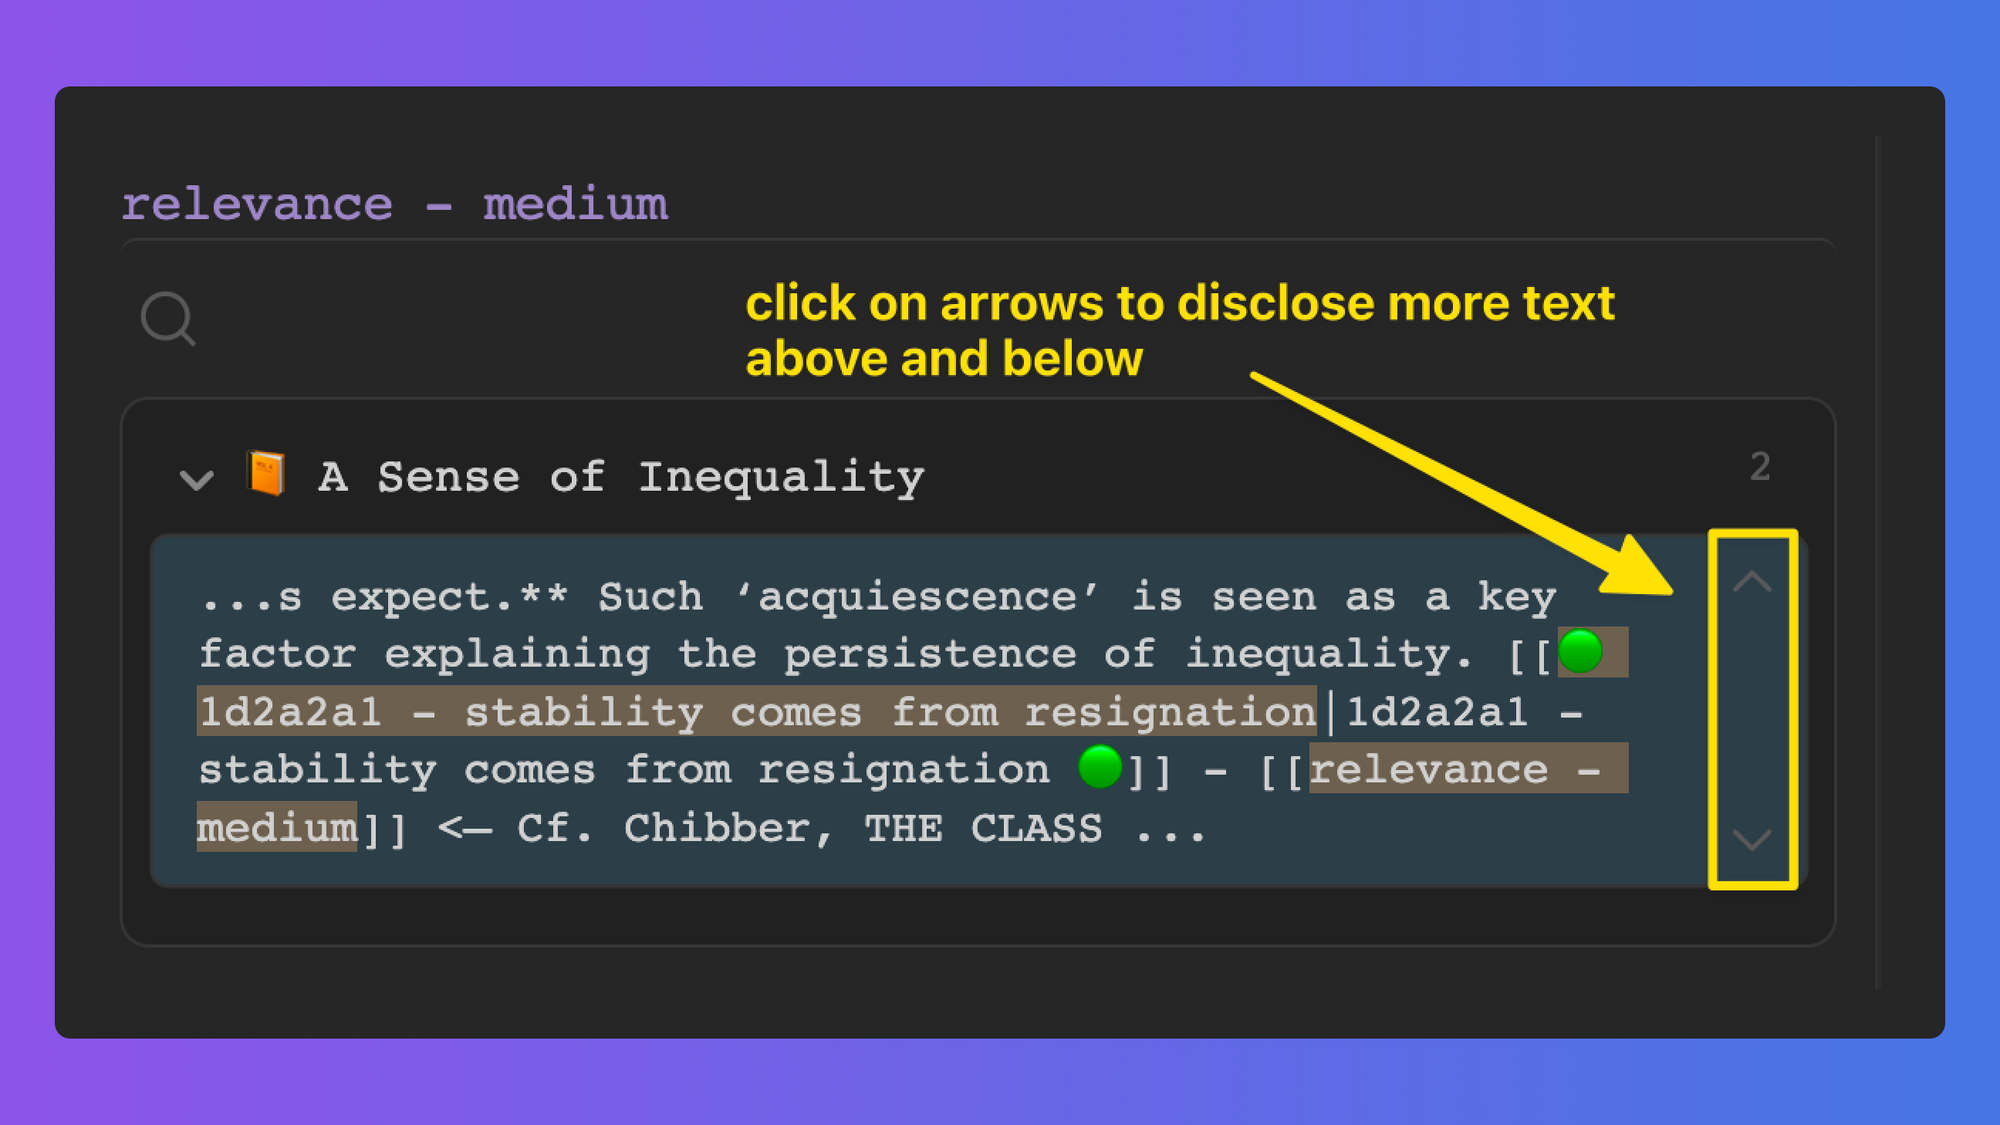
Clicking once on the down-arrow reveals the rest of the block beneath the search terms so that I can now see in full the three lines that constitute a note I made about comparing the highlighted passage from A Sense of Inequality to an argument made in another book, The Class Matrix.
If I click on the up-arrow, everything else in the block of information gets disclosed.
Advantages and disadvantages of using this approach
One advantage of using the up- and down-arrows to view the search results generated by relevance-level queries is that you remain on the same page while viewing the results. For many of us, staying on the same page is less disorienting than clicking on search results and opening up in separate panes or windows the pages those results are being pulled from.
One disadvantage of this approach is that you are able to view the results only in (uneditable) Markdown. It is often the case that when I apply a relevance-level tag to a quotation, I also place in boldfaced type the most relevant words from the tagged quotation. Yes, I can see those in Markdown—they're in between **two pairs** of asterisks—but they are easier to see when viewed in Preview mode, where boldfaced type gets rendered as, well, boldfaced type.
If you want to view search results in Preview mode, you might want to use hovering windows, as explained below.
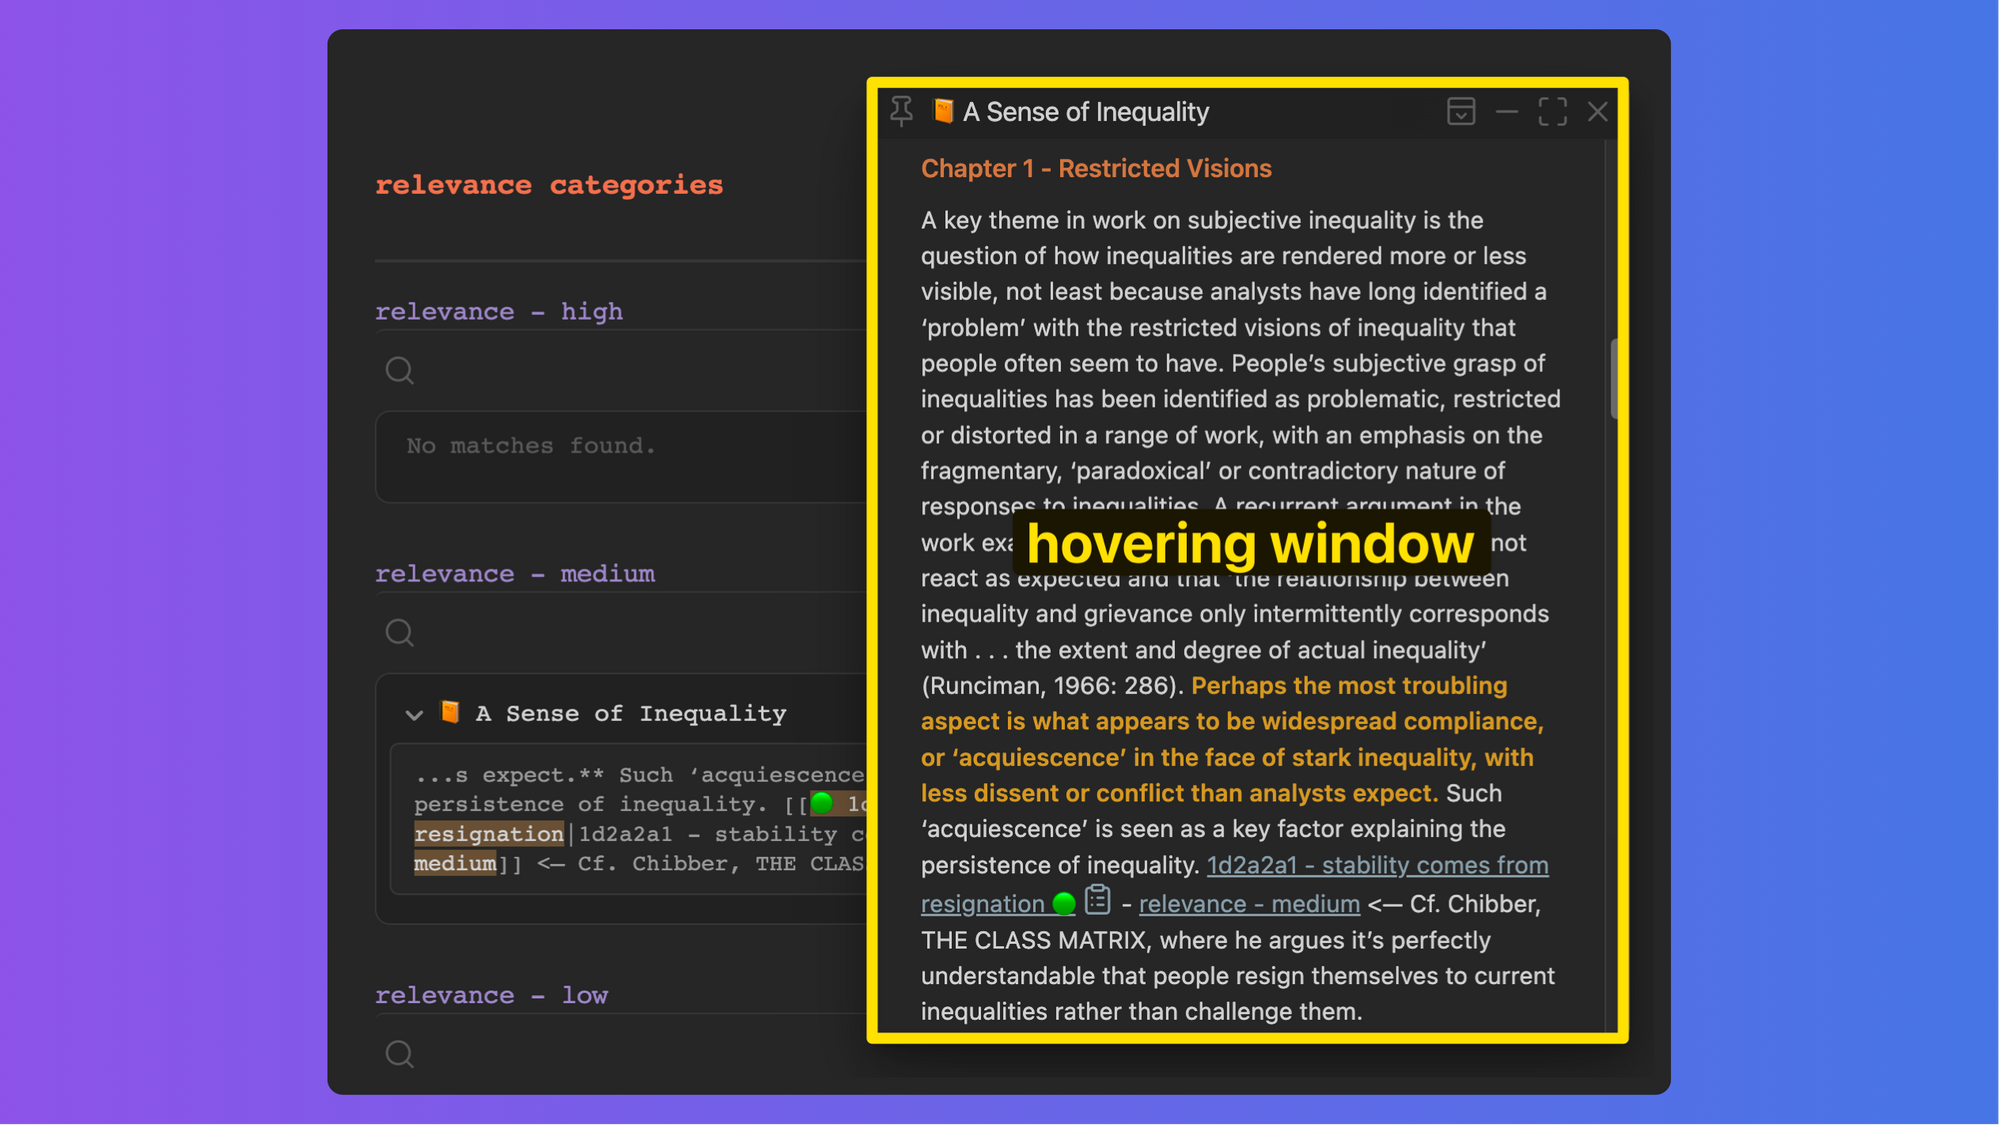
b. Use hovering windows (a.k.a. popovers)
There are at least two options when it comes to viewing in Preview mode the search results generated by relevance-level queries. Regardless of which option you select, opening up a search result in a hovering window will take you to the top of the block that you have applied a relevance-level tag to.
b1. Use Page Preview (core plug-in)
First make sure you have enabled the Page Preview plug-in (go to Obsidian's Settings, under Options click on "Core plugins," and then scroll down to the Page Preview one). Then, all you need to do to view your query results in Preview mode is
- place the mouse arrow over the search result (this should make it light up) and
- press the Command or Control key (Command if you're on a Mac, Control if you're not on a Mac)
Instructions on how to use Page Preview can be found on this page of the Obsidian Help website.
b2. Use Hover Editor (community plug-in)
First make sure you have enabled the Hovering Editor (go to Obsidian's Settings, under options click on "Community plugins," and then scroll down to the Hover Editor one). Then, all you need to do to not only view your query results in Preview mode but also edit them is
- place the mouse arrow over the search result (this should make it light up) and
- press the Command or Control key (Command if you're on a Mac, Control if you're not on a Mac)
- switch to edit mode
When it comes to switching to edit mode, you have the following options:
3a. click on the edit button, usually at the top right of a page
3b. invoke the Command Palette (Cmd/Ctrl + P)
3c. use the keyboard shortcut for toggling between Preview and Editor modes (Cmd/Ctrl + E)
Once you have switched to edit mode, you can make changes to the document displayed in the hovering window.
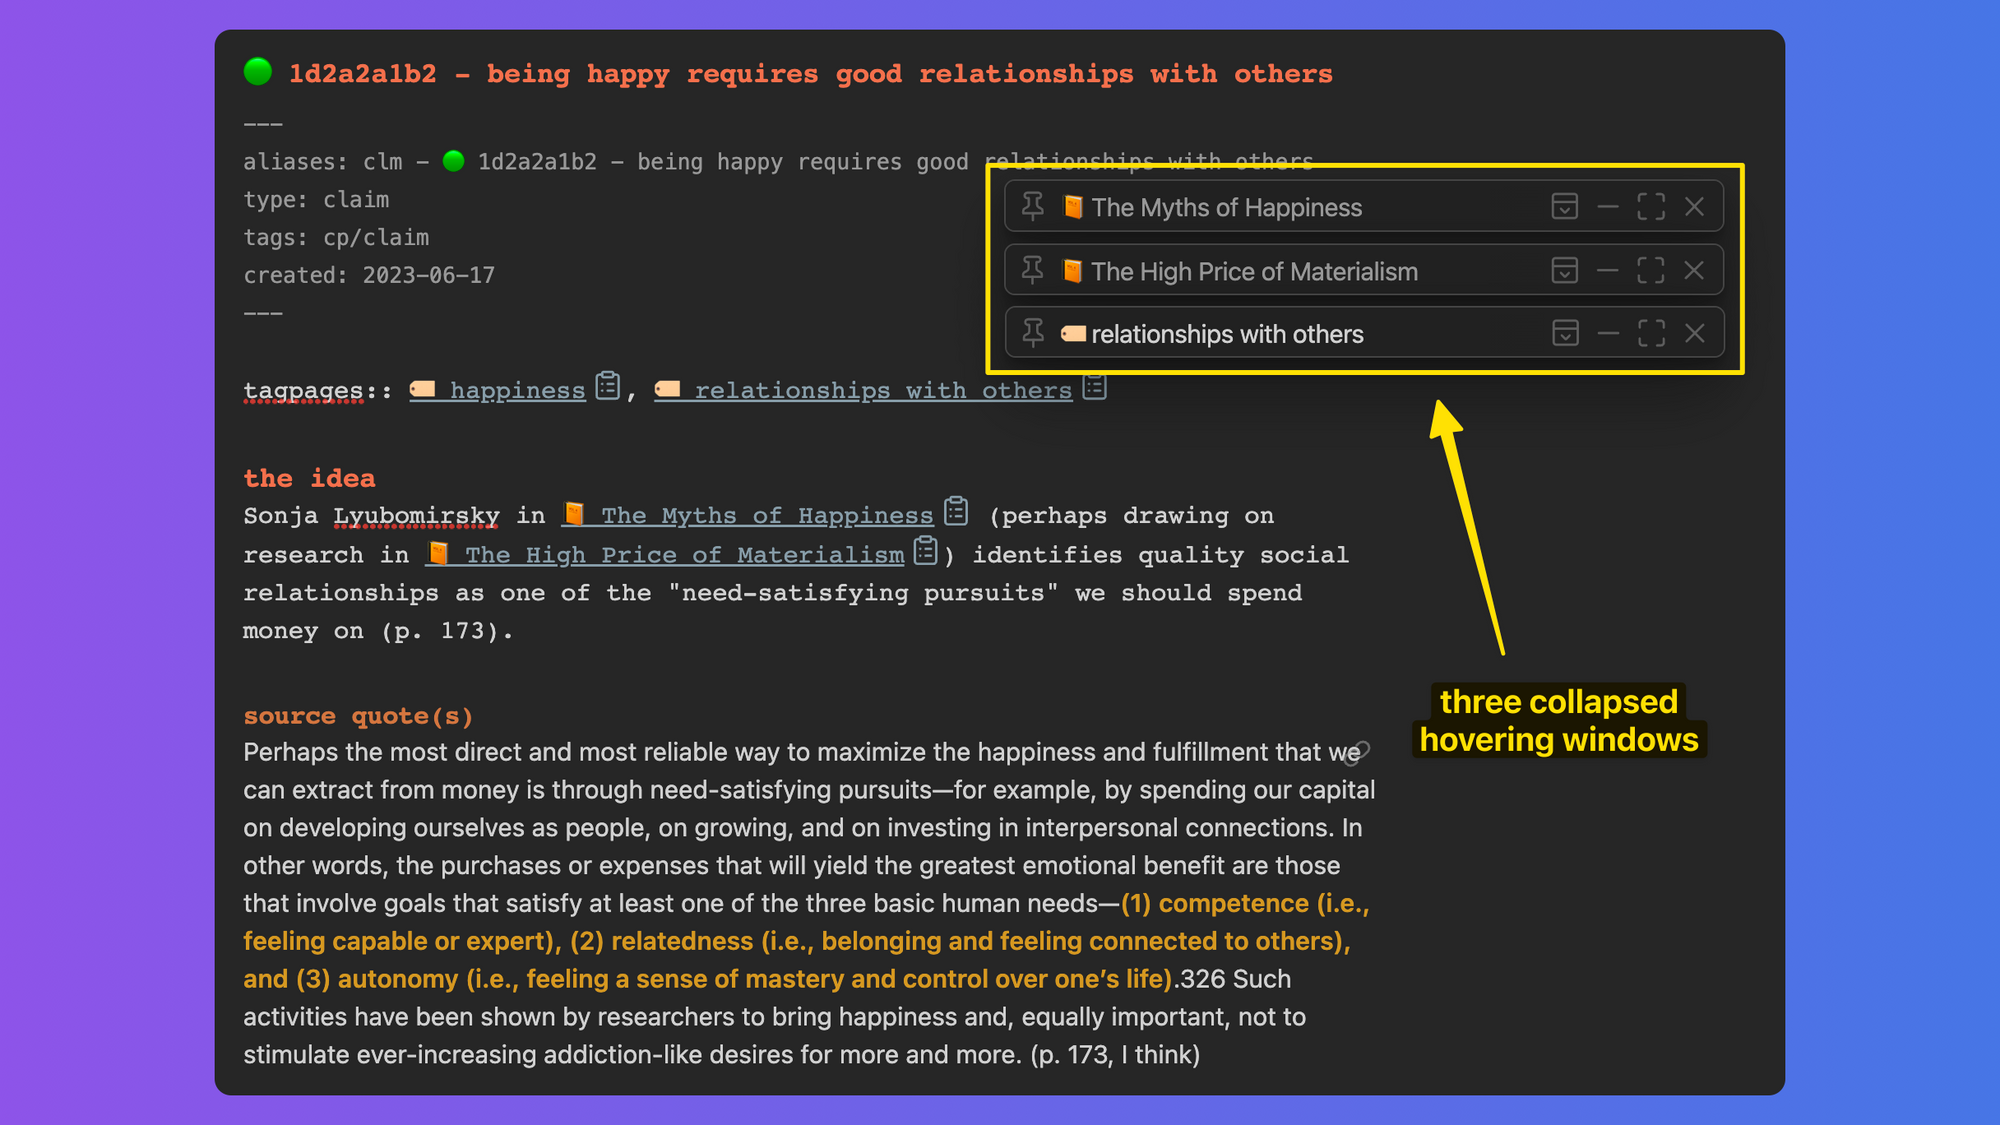
In addition, a hovering window that pops up can be dragged and resized. It can also be pinned to your workspace (it autopins as soon as you drag it), which means you can have multiple hovering windows open at the same time (you can collapse the windows too so that you see only a narrow rectangle displaying the title of the page each window represents, as shown below).
Logseq users
If you want to use RLT but are a Logseq rather than an Obsidian user, watching the following two Logseq videos (made by One Stuttering Mind) might be of help.