2. PDF-annotation apps for the iPad that play well with Obsidian, Logseq, etc. 📝
If you're one of the cool kids, then you use one (or more) of the now long list of what are sometimes called "connective-thinking apps" (e.g., Craft, DEVONthink, Heptabase, Logseq, Notion, Obsidian, Roam, Scrintal, Tana, The Archive, Tinderbox, etc.). This post will talk about PDF-annotation apps that can work well with such apps.
Note: I had planned to include in this post a discussion of the PDF-annotation features in Readwise's brand new read-it-later app (released as a public beta earlier this week). However, although the app is pretty darn amazing, its PDF features have yet to be developed enough for it to make sense to review them.
Seven features
If you are someone for whom it is important to be able to extract from a PDF passages you have highlighted and/or notes you have made and then put those into your connective-thinking app, then chances are you would be pretty happy if you had a PDF-annotation app that would
- have what I will call a “smart highlighter,” by which I mean a highlighter that automatically creates machine-readable highlights (so that they can be easily exported to your connective-thinking app(s) of choice);
- make it easy to manually copy and paste highlights into another app (in case your workflow involves exporting to your connective-thinking app only some of the highlights you make);
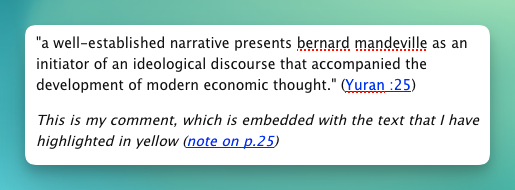
- have the option of attaching the notes you make to, or embedding them within, the highlighted passages those notes are about;
- export annotations (highlights and notes) in an uncluttered format;
- include in exported annotations links back to the pages of texts where those annotations were made;
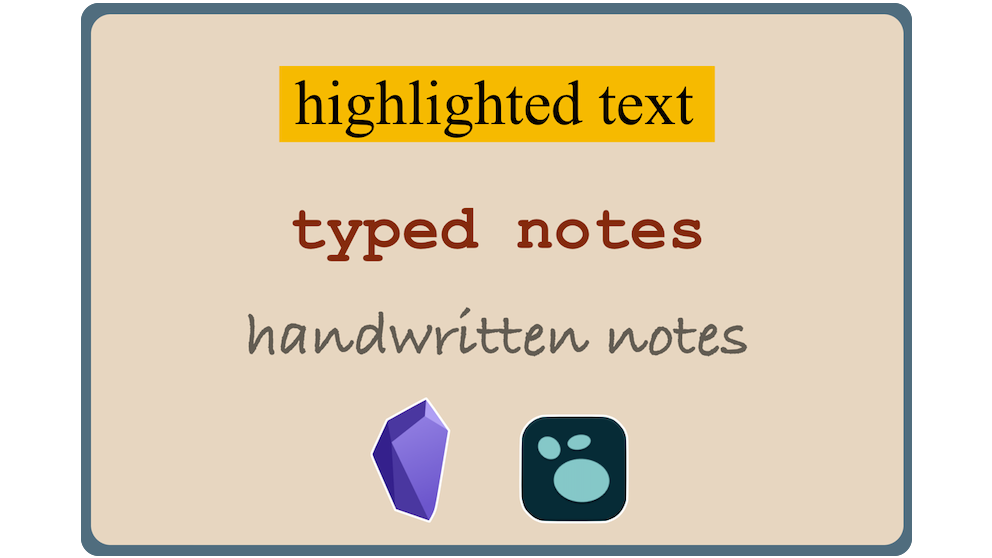
- convert handwritten notes into typed text;
- enable you to handwrite notes that remain handwritten and yet also searchable.
Unfortunately, no PDF-annotation app that I am aware of does all of these things: some apps (e.g., GoodNotes and Notability) have features 6–7 but lack features 1–5; other apps (e.g., Highlights and the Zotero iOS app) have features 1–5 and to some extent feature 6, but not feature 7.
The table below shows how the six main PDF-annotation apps discussed in this piece compare with respect to the seven features listed above.
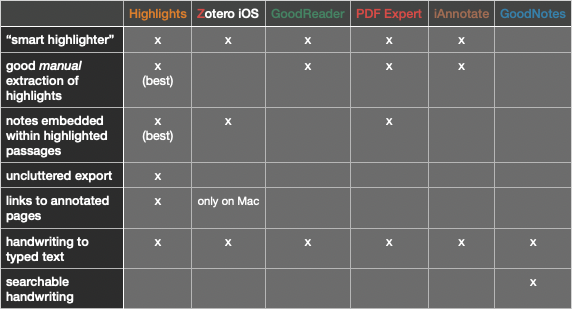
However, it's likely the case that only some of these are must-have features for your own use cases. In the remainder of this post, I'll talk about each of them so that you have a better sense of which PDF-annotation app(s) might be best for you.
1. Use a "smart highlighter" to automatically create machine-readable highlights
This feature is probably essential for anyone who wants to export all or most of their highlights to a connective-thinking app. Plenty of PDF-annotation apps have this feature (e.g., GoodReader, Highlights, iAnnotate, PDF Expert, Zotero iOS), so if this happens to be the only thing you need a PDF-annotation app to do, you have several to choose from.
2. Manually copy and paste highlights into another app
Highlights is the clear winner here because it can quickly copy and paste not only (a) highlights but also (b) notes you might choose to embed within those highlights. No other iPad app I know of does b.
Plenty of other apps do a.
- PDF Expert is just as speedy as Highlights when it comes to copying highlighted text—once you’ve highlighted the text, just (1) tap on the highlight and (2) select “copy.”
- GoodReader and iAnnotate can do a, just not as quickly as can PDF Expert and Highlights. In GoodReader, after highlighting text, you need to (1) click a check mark to indicate you are done using the highlighter before you can (2) click on the highlight and (3) select “copy.” In iAnnotate, after highlighting text, you need to (1) long-press on the highlight with your finger before you can (2) select “Copy Annotation.”
- Of the apps so far under discussion, Zotero iOS is probably the slowest when it comes to doing a because even with the highlight created, you still need to long-press with a stylus or your finger and then move your stylus/finger over all the text you want to copy. Only after doing that does a little menu pop up with “Copy” among the options. (It is because Zotero iOS is slow at this that I prefer to use Highlights—but see “Workflow #2 using Zotero on Mac” just a little ways down the page.)
Why extract manually rather than automatically?
Why might you want to manually extract highlights rather than have that be done automatically? It depends on what workflow works best for you. Following are three workflows you might find yourself wavering between:
- export all of the highlights and notes you make on a PDF only after annotating the whole thing
- export some of the highlights and notes you make on a PDF only after annotating the whole thing
- export some of the highlights and notes you make on a PDF while annotating whole thing
If it’s #2 or #3 that you do, then you have reason to manually extract highlights.
Workflow #2 using Zotero on a Mac
As I noted above, Zotero iOS is probably the slowest when comes to manually extracting annotations, but if the second of the three workflows listed above is of interest to you, know that once you pull an annotated PDF into Zotero on a Mac, you can open it in the PDF reader built in to Zotero. Then it’s just a matter of
- clicking on a highlighted passage
- using
Command + Cto copy it, and then - pasting the passage where you want it.
And yes, if there is a note that you have embedded within the highlighted passage, it too will be copied over, as you can see in the screenshot below.
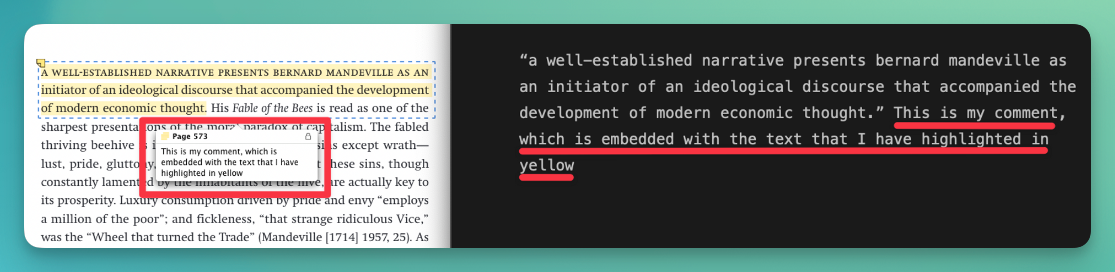
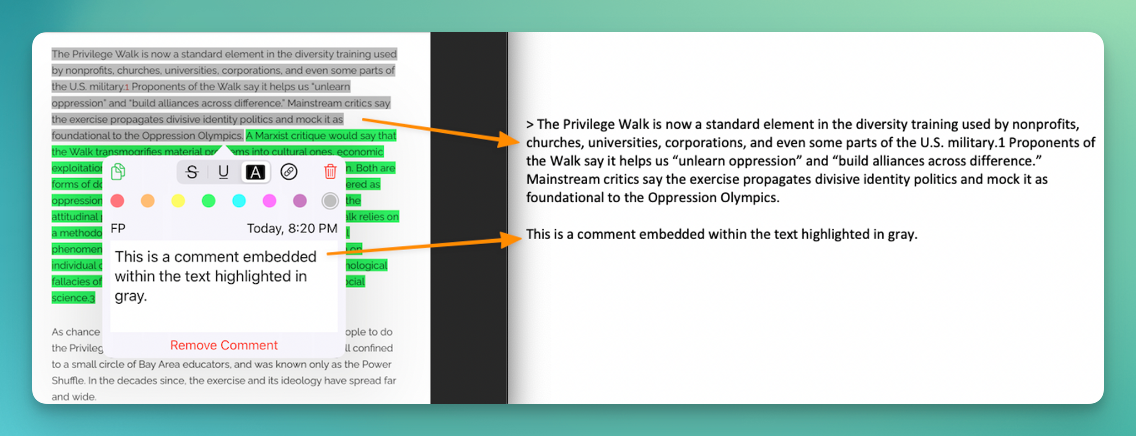
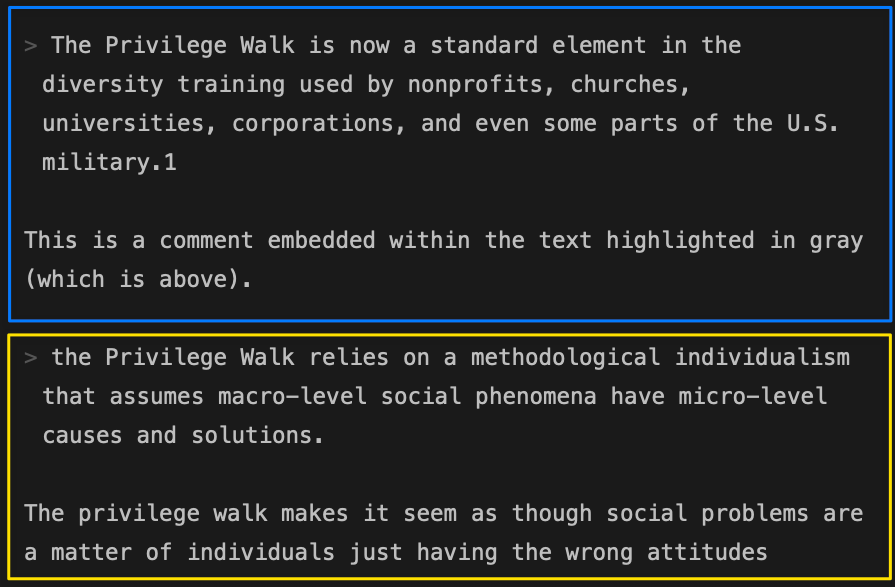
3. Attach notes to, or embed them within, the highlighted passages they are about
Some apps, such as iAnnotate, make it look as if they do this but in fact keep the two separate, which becomes clear when you export your highlights and notes.
Zotero iOS, Highlights, and PDF Expert, by contrast, keep the two together, and that’s how I like it when I export them to my connective-thinking app (Obsidian, in my case).
Highlights
In the blue box below, first comes the highlighted passage, then comes the comment. The same goes for what’s in the yellow box.
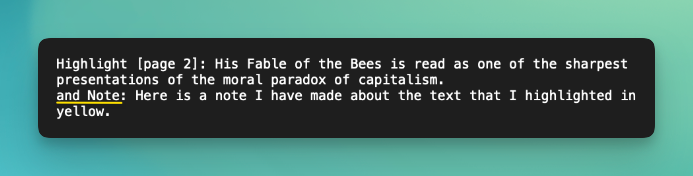
Zotero iOS
Zotero iOS uses italics to distinguish highlighted text from the notes embedded within the highlighted text.
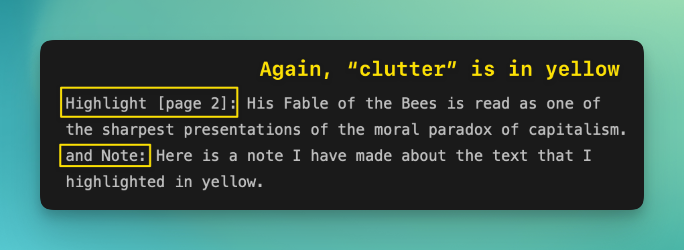
PDF Expert
When exported using the Mac version of PDF Expert, notes embedded within highlights are preceded by “and Note,” as can be seen below.
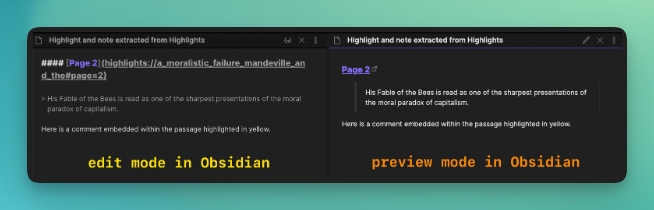
4. Export highlights and notes in an uncluttered format
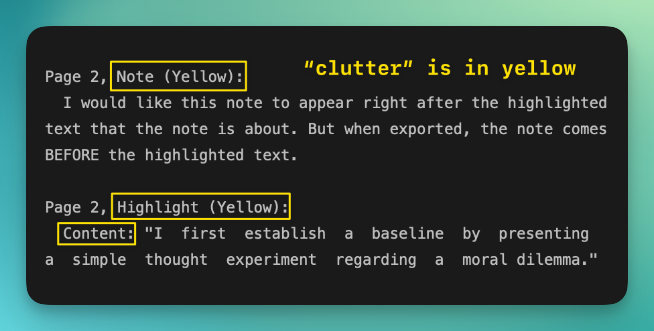
To my knowledge, at this time it is only Highlights that exports highlights and notes in what I consider an uncluttered format.
Below are screenshots of what annotations exported from Highlights look like after they have been pulled into my Obsidian vault (things look cluttered in Obsidian’s “edit” but not “preview” mode).
You might actually want some "clutter"
What I call clutter might for some people be useful information that they want to pull into their connective-thinking apps.
For example, some people might want to export not just text but also other information, such as
- the color of the highlighter used (some people use different colors when highlighting documents—a practice, by the way, that Fiona McPherson advises against in her book Effective Notetaking, but others find this practice useful, including Bri Watson) or
- the kind of tool used (say, an underliner tool as opposed to a highlighter tool).
Moreover, if you have computer skills that I lack, you could probably find and install a script that would de-clutter highlights and notes exported by your PDF-annotation app of choice.
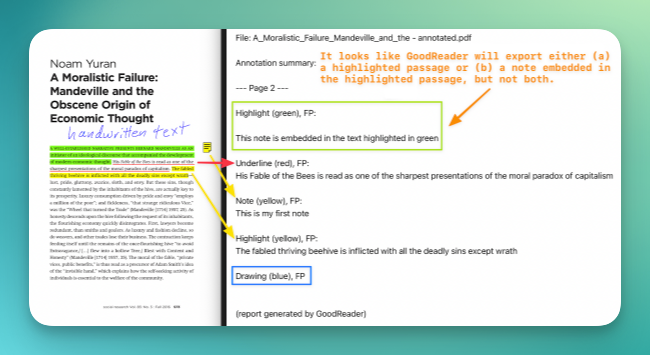
Below are screenshots of what I consider cluttered annotations exported by GoodReader, iAnnotate, and PDF Expert. I haven’t ruled out the possibility that I might someday want to add to my connective-thinking app some of the information you see below, but for now I consider it clutter.
GoodReader
iAnnotate
PDF Expert
5. Include in exported annotations links back to the pages of texts where those annotations were made
It’s not a deal breaker for me if a PDF-annotation app doesn’t have this feature. When I first encountered it, I thought, “This is cool, but 99% of the time, I just need to know the page number of the annotation.”
But if you want not only to know the page number but also to click just once to be brought to that page, this is definitely a nice feature to have.
One reason you might want to use this feature is that it can reduce or eliminate the “context switching” that otherwise occurs when you have to search for the file on your computer, open it, and then scroll to the page and then to the spot on the page where the annotation was made.
Both Highlights and Zotero iOS have this feature.
6. Convert handwritten notes into typed text
Converting handwritten notes into typed text can take two forms:
1. on-the-fly conversion while you are handwriting the notes
On-the-fly conversion is possible with the iPad’s built-in Scribble feature. This feature is available in lots of PDF-annotation apps now. Some of those apps (e.g., PDF Expert and GoodReader) have bigger pop-up note boxes to write in than others (e.g., Highlights and iAnnotate), but that actually doesn’t matter since you can write outside the pop-up box and Scribble will still convert your handwriting into typed text. (To see the different-sized pop-up boxes and why their size doesn’t really matter, go here.)
When it comes to this sort of workflow, Highlights has one very minor drawback the app currently has is that if you tap towards the bottom of the screen, the note box will pop up down there—which, depending on how you’re holding your iPad, means your palm might not be able to rest on the screen while you’re writing, which can make it feel awkward to write a note. But there’s an easy fix for this: just scroll down a little more so that you can tap higher up on the screen and have the note box pop up there.
2. conversion into typed text only after the handwritten note is made
Both GoodNotes and Notability can do this, but if your plan is to convert all the handwritten notes you place on a PDF into typed text, I would say don’t bother because
- you would then have to circle and convert each individual handwritten note and
- when you convert handwriting to typed text, you usually need to modify the text since handwritten sentences typically get broken up into several lines of typed text (as you can see here).
You could save some time doing b by pulling converted text into TextSoap ($50 to own the app, or you could get it through a SetApp subscription), but you would still be wasting lots of time doing a.
Nebo can also convert handwriting to text (or rather it can “copy as text,” and then you can place the text elsewhere—just not on the PDF itself), but Nebo’s PDF-annotation tools are not up to snuff at this time (they’re currently no better, and probably even worse, than what Flexcil and Collanote offer, both of which offer pretty robust free versions).
That said, Nebo is great for taking handwritten notes (just not on PDFs themselves) and as such should be considered alongside GoodNotes if you’re looking for an app that converts handwriting to text. Nebo can do it on the fly or after the fact, and when it does it on the fly, it is using not Scribble but instead Nebo’s own “write-to-text conversion” feature, which its website describes as the “world’s best.” (But again, if it’s searchable handwriting you want, GoodNotes is the app to use.)
7. Handwrite notes that remain handwritten and yet also searchable
If searchable handwriting is absolutely essential to you, then GoodNotes is the way to go. As noted in the first installment of this series about PDF-annotation apps, GoodNotes returns as results not just the files the searched terms appear in but also a snapshot of where in those files the terms appear—and then when you click on those snapshots, you are taken to the place in the text that they are snapshots of.